Ok…. so the title of this post sounds a little like a weird Indie film title… oh well … I think the tale of this table is so long it could be made into a short Indie film… who would they get to star as me… covered in sawdust… stain… gunk I don’t even know what it is… not many women I know.. maybe if the part was written for a man!
Perfect guy for the job.. MIKE ROWE…
- Mike Rowe as ME!
This is a nasty, dirty job most of the time and I pretty much looked like the picture of Mike above.. FUN times 😉
On to the tale of the TABLE…
This table was listed as a “paint me” special at a local shop…. I of COURSE fell in love with it immediately because of her GORGEOUS legs… she is mahogany and has no missing parts (if you don’t count the missing leaves, which I don’t ’cause they are always missing, umm.. is there a special place where all of the missing socks and table leaves go to be found later?)
The Top:

- The MOSTLY Before of the Top

She had some pretty good-sized scratches on the top, but I was hoping to be able to sand them out and stain the top.. my backup plan was to paint the top.. I told myself there was NO WAY I was removing the veneer… I sanded the top down and had to fill one tiny scratch that was just too deep, I then stained the top Kona, I had to use two coats…. after the first coat some of the scratches were still visible, but once the second had been applied they virtually disappeared.. man did that make me happy!
Now, for the apron..
She had a lot of allergatering (can I use this word in this way? sorry if not, but that is what was happening!) I started out sanding the apron with the orbital sander and that worked great, except for the areas near the top and the bottom molding.. I tried to use my mouse sander for those areas, but the poly just kept melting on the sandpaper and gunking it up.. so the table sat for a while I thought of how next to tackle it. My next thought was to use a stripper (as a side note I do love it when my husband calls me and asks what I’m up to and I can honestly tell him “stripping in the garage”.. hee.. hee, look it’s the little things that keep you going right?) Anyway.. I did two applications of the stripper, it took a lot of it off, but still left goopy areas that I was having a hard time getting to, not to mention getting off so…

- Yummy Gunk & Trim

My final solution (partially based on the fact that some of the veneer was loose) was to remove the trim molding (intact, to be reattached later) remove the veneer and use the wood underneath..

- My Veneer Removing Tool of Choice

Now some of you may know that depending on the age of the piece you will still have a VERY good quality wood under the veneer.. I was totally banking on that! So I removed the veneer, which could have been a much worse job than it was, and sanded the apron with 80 / 100 / 150 / 220 sandpaper, in that order. The wood was beautiful.. and in great shape..

- Beautiful Wood Apron

I applied a coat of Kona stain and let it dry. Meanwhile I removed the old nails & gunk from the apron trim piece and sanded it down to reattach. I applied some glue, clamped it on and nailed the piece to the table using the original nail holes. I had to trim it down when I got to the end because the circumference of the table had changed with the removal of the veneer, by 1 1/2″! After I filled the nail holes & sanded the trim piece I then stained it to match the rest of the top.
After everything was stained and dry I applied a couple of coats of polyurethane to the top and apron.
Whew! Now the base..

- So PURDY!!!

She got a good sanding (again the allergating) and two coats of ASCP in Provence.

- Bringing Sexy Back!

We have a had a run of nice weather here recently so I was able to take her outside to sand her down and blow her off with the blower (love that!) I put a coat of clear wax on the base and then I painted a few areas on the legs with an accent stripe in Old Ochre and then buffed her down.

- Old Ochre Stripe

Oh yeah, almost forgot… she also got some new wheels.. the original ones were missing (went to hang out with the socks & leaves I guess :0) so I replaced them with some wood ones that I think would have been similar to the original wheels.

- Replacement Wooden Wheels

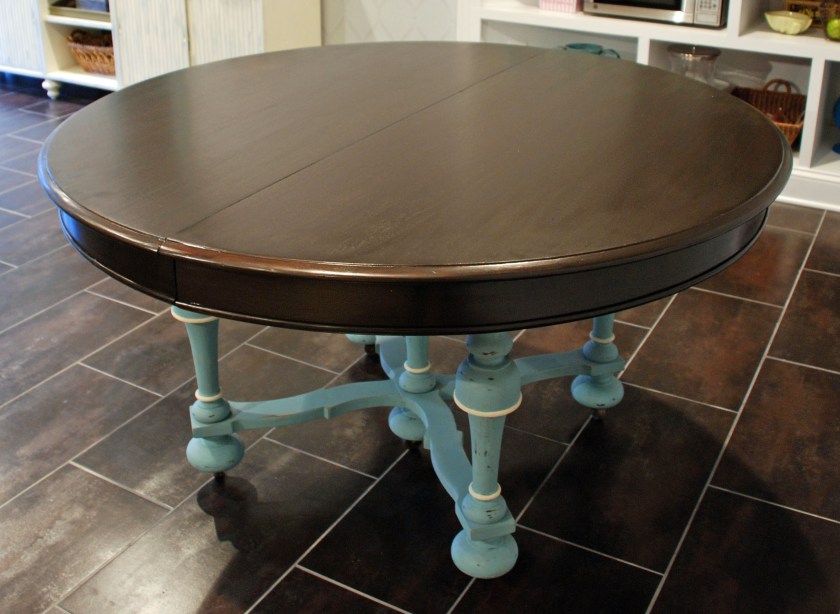
The End Result….
I love this table… it’s funky legs, the color combination, the wheels and the fact that it was resurrected to provide many more years of happiness for someone! The top is not “showroom” perfect but it is as good as it can get… and it really does look great!

- Dining Table – After


- Finished Table in Basement Kitchenette

I would love to hear what you think about her… I love comments 😉
Thanks for stopping by!
Linking Up to These Parties!
Domestically Speaking
The Shabby Creek Cottage
House of Heoworths
French Country Cottage
Miss Mustard Seed
My Romantic Home
Funky Junk Interiors
Sisters of the Wild West
Between Naps on the Porch
Coastal Charm
Vintage Wanna Bee
A Stroll Thru Life


This table is now beautiful! Most excellent and inspired re- do! Thanks for sharing your ardorous process!
Best, Geri
LikeLike
Thanks Geri!
LikeLike
Gorgeous, love it.
LikeLike
I thought you might like it… 😉
LikeLike
Fabulous! You’ve got some patience and perseverance! I just blogged about a desk I did in Provence. Love that color!!
LikeLike
I checked out your desk.. It’s gorgeous!
LikeLike
Such a beautiful makeover!!! Love the colors.
LikeLike
Thanks Veronica!
LikeLike
So pretty! I will be doing this to the table in my kitchen very soon! I tried to reply to your comment on my blog but you have a “no reply” here is how to fix it if you want.
http://btweenblueandyellow.blogspot.com/2010/11/thank-you-give-away.html
LikeLike
WOW! What a transformation!!
LikeLike
I LOVE this! I would love if you would share this at the Crazy Cute link party happening at Between U & Me right now! I’ve got a totally awesome giveaway this week, too!
OOH! AND, I’m your newest follower! 😉
http://www.betweenuandme.com
LikeLike
Courtney.. So sorry I missed your party! Your comment went to my spam and I just saw it! Thank you for inviting me!
LikeLike
I am very impressed with your abilities! You have helped me to learn something here. I have recently gotten the bug and have been sanding a few pieces here and there. Stripping you can have….I don’t like it. But I guess there are some instances where you have to.
Great job! Love the pretty blue legs!
♥charlotte
LikeLike
Thanks! Love your photography on your blog!
LikeLike
so pretty! love your kitchenette, too:)
LikeLike
Thanks Lynn… My husband and I finished it ourselves.. I think I will do a post on it one day… it was a labor of love for sure!
LikeLike
Your hard work really paid off….it’s beautiful! Thank you for sharing your lovely project at Potpourri Friday!
LikeLike
Thanks Honey! I just LOVE your blog!
LikeLike
What a great makeover. I just did up an antique pine table with a French wash application but now I have seen this I want to change the colour and do it slightly blue/green. You have definitely inspired me.
If you want to look at my makeover here is the link:
http://www.leecarolineart.blogspot.co.nz/2012/01/diy-french-washed-furniture.html
LikeLike
Lee,
Loved your table… that looked like a lot of work too! Thanks for checking out my table! By the way we have a Schnoodle too.. he’s Wookie colored, always looks like an old man with crazy eyebrows! I’m a new follower of yours!
LikeLike
Oh my, this is lovely. Awesome transformation!!
I tried to follow your RSS feed, but it didn’t work?
Happy Friday! Karah
LikeLike
Hmm.. I had someone else make that same comment but when I try it it appears to work.. let me check on it! Thanks for the heads up!
Susan
LikeLike
Oh my…what a wonderful find, LOVE it ! The William and Mary legs are fabulous..I have been having a love affair with round tables as well, you did a great job !!
LikeLike
Ooohh… The legs have a name! Thanks for that tidbit of information and the lovely comment…
LikeLike
Wonderful! I love the coloring on the legs you chose and how you finished them. Of course the top looks beautiful with it’s new finish. It looks like it was a big project- excellent job!
I think you have a very valuable piece there now!
LikeLike
Thank you Liz! I’ve had worse projects though… I enjoyed this because I knew how gorgeous it was going to be when it was done.. such a great motivator!
LikeLike
This is beautiful. I love the dark top with the provence legs. Very nice.
LikeLike
Thanks Danielle, I just love a dark / bright combination!
LikeLike
Beautiful!! I’ve been thinking about refinishing our dining room table but wasn’t sure what to do about the veneer. Now I know!! Thanks for sharing!
Found you on Funky Junk Interiors
Visiting from leahkoenig.blogspot.com
LikeLike
Well patience is a definitely your virtue. GREAT JOB.
LikeLike
Beautiful end result!
LikeLike
Absolutely gorgeous!! Great work, and what a transformation!
LikeLike
Thank you Karen!
LikeLike
What a fabulous job you did! The top looks so great. I love the color of the legs! Hope you are enjoying the beauty from your hard work!
LikeLike
Thanks Julie… but it’s not a keeper, so it is just waiting patiently for someone to take her home 😉
LikeLike
Your table looks lovely. I know just how hard that was! Stripping, sanding and refinishing furniture is a LOT of hard work. But the results are so worth it! Nice job.
LikeLike
Thanks for checking her out Deborah! She was a labor of love 🙂
LikeLike
Beautiful!! I love the colors!!
LikeLike
Thank you Cristina.. I’m in love with the new bright blue & turquoise colors that are coming out! Yumm…
LikeLike
What an incredible transformation! It’s simply beautiful.
LikeLike
Thank you! I just love it to…
LikeLike
My mouth… is just hanging open! I would LOVE that table… it is AMAZING!!
LikeLike
You are so nice Jenn! Thanks for checking it out!
LikeLike
I have the exact same table sitting in my garage, and so does Karen from Redoux : )
LikeLike
That’s crazy! I hope yours is in good shape, I wish I had a leaf or two as well…
LikeLike
Seriously inspiring, your srptep by step makes the project feel achievable (minus the removing and reattaching of the veneer of course! That just scares the hell out of me) haha
Thanks for sharing! I’m in love with the color scheme.
LikeLike
Thanks so much Dawn it was a very pretty table when complete!
LikeLike