
Ok… I don’t like to admit I’ve made a mistake… it’s a character flaw I know but I REALLY don’t like making mistakes! Sadly I made one with this French style Thomasville dining table…
This is a wonderful table set I purchased over the summer, it’s Thomasville (from the 1960’s I believe) and it has 2 armchairs and 4 side chairs as well…
I was hoping to refinish the top in a darker stain but there were too many issues with it to make that work (I tried)…
BEFORE

Here is the first “After”… I do love the Annie Sloan Chalk Paint Graphite top but the base in Florence with the dry brushed Graphite is just too harsh for me… I waited for DAYS to see if it would grow on me but it didn’t so then I had to fix my “mistake”.. ARGH!!!

So I decided on Annie Sloan Duck Egg instead… as I was re-painting it I felt better immediately… I knew THIS was the right choice!

Now onto the chairs… 6 of them to be exact… have I ever mentioned how much I dislike painting chairs? They are very labor intensive as they take sooo much time, painting distressing & waxing… if I was just spray painting them no big deal but of course I was hand painting them… my poor hands are like claws now!
BEFORE

Here they are so much prettier in a couple of coats of Duck Egg!

And just check out this PERFECT fabric I happen to have on hand… and have enough of… I got super lucky with this! The blue in the fabric is almost exactly the color of Duck Egg!

I removed the chair seats from the frames and removed the old fabric. The two armchairs are going to have their backs upholstered to give the a slightly different look… no need to paint the cane on these!

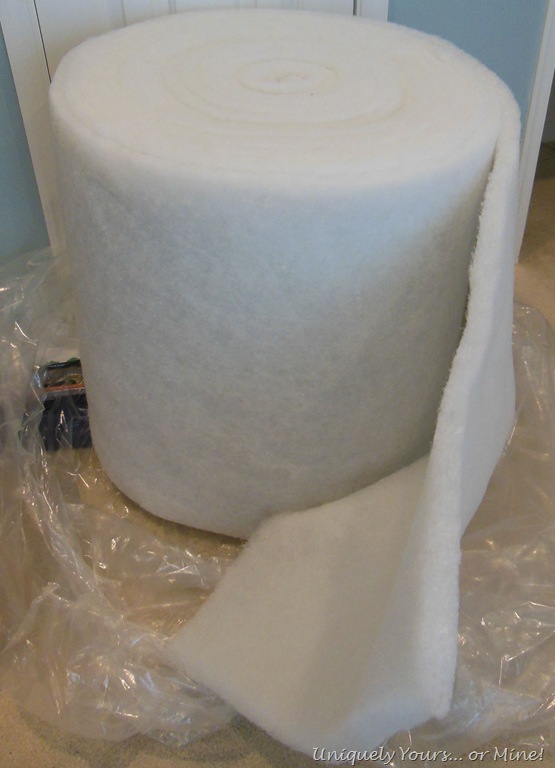
I picked up a new roll of batting… trust me I will use all of this, not on this project but I have a lot of chair seats to update!
As you can see I have already distressed and waxed the chairs. I have also reattached the recovered seat cushions… now on to the backs!
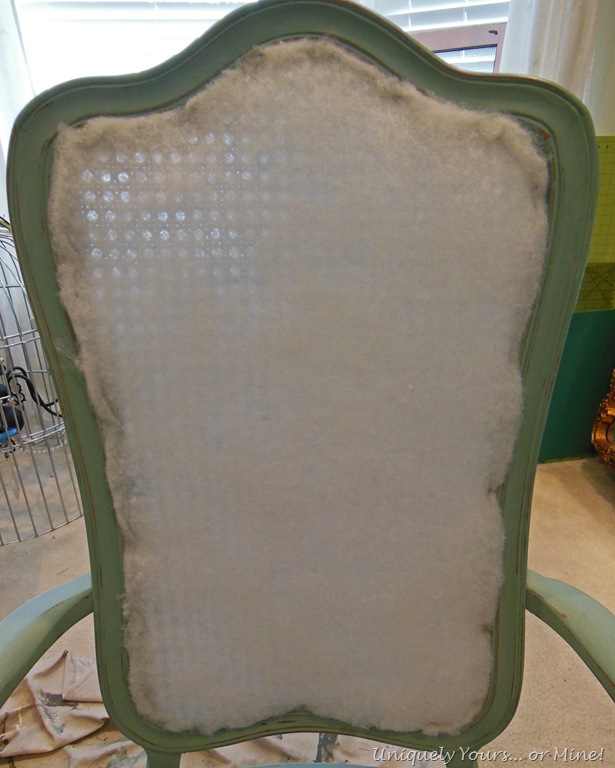
First I cut out a piece of batting roughly the size of the back of the chair.

I then attached it to the back of the with staples, no need to use this many staples (I didn’t on my second chair) you are just stapling it in to loosely hold it in place. Trim the overage with scissors.
I roughly cut the fabric to size and stapled it in over the batting staying close to the edge of the chair. These staples should be positioned very close to one another and the fabric should be pulled taught before stapling it. Always start your place staples first with one at the top, bottom and both sides, pulling the fabric taught before each staple. Once you have our place staples in then start from the middle and work your way to the sides.
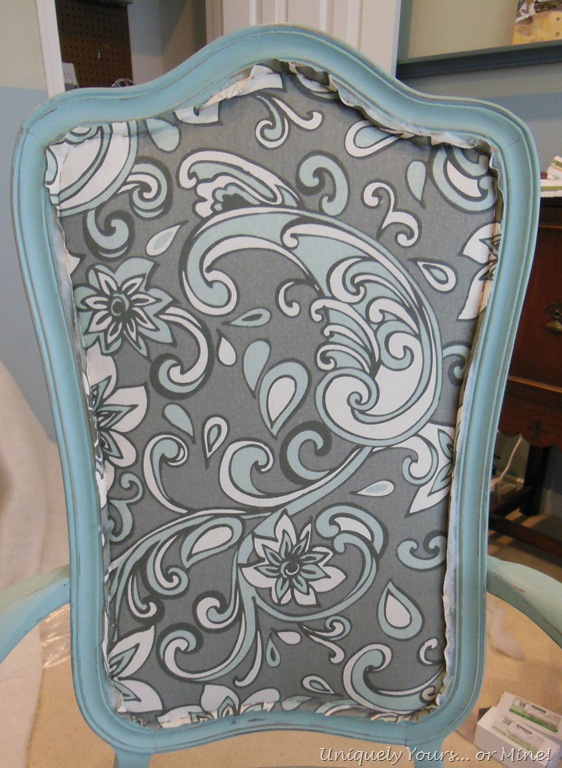
I made double welt cording and hot glued it around the edge.

I did the same process as above for the back but I had to staple the pieces to the sides of the chair as there was no wood to attach the staples to on the back. This is a great dark grey fabric with a herringbone pattern…
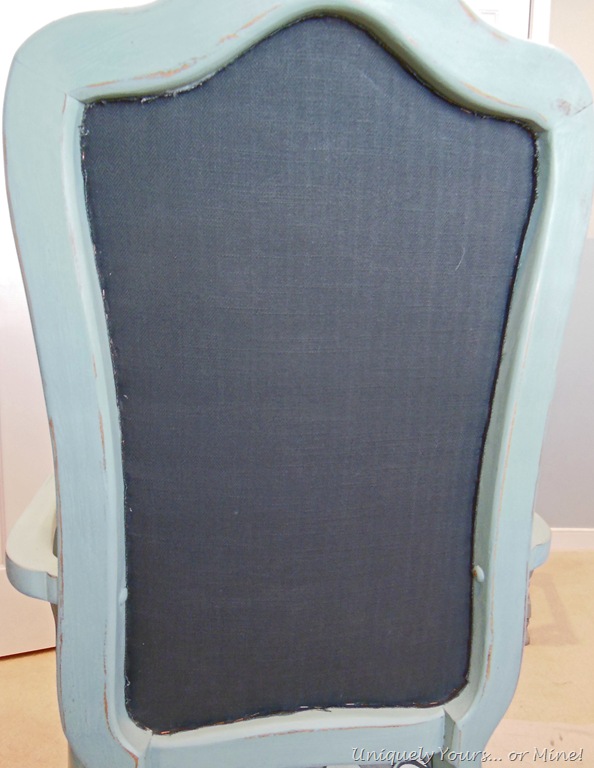
Again I made double welt cording and hot glued it around the edge.

Here is the finished dining set!

The fabric coordinates perfectly with the table and chairs!

I love that the captain’s chairs have the padded backs.

I also added a little pop of Provence chalk paint in the grooves around the table and chairs.

One complete dining set down… one more to go!

This was a TON of work and thank goodness my SAH (Super Awesome Hubby) helped me out a lot on this project! I just love the final results and I am so happy to have it completed! I have one more table and chair set that is VERY close to being complete as well, I should be able to share it with you this week!
This set is for sale and will be listed on my FOR SALE page, which seems terribly empty… I am going to the Lucketts Spring Market again this year and I need to have a whole lot more done before May 17th or my 10×20 booth will be very empty! If you are interested check out some pictures from my booth and around the Market from last year… I hope you can make it to the show it is ALWAYS full of great stuff!
As always thanks for stopping by…
Until next time!

Linking up to these parties!
Between Naps on the Porch, Coastal Charm, A Stroll Thru Life, The Dedicated House, Elizabeth & Co., Savvy Southern Style, Domestically Speaking, From My Front Porch to Yours


Great makeover, I like the color better.
LikeLike
Thank you… It was a labor of love for sure!
LikeLike
I am so in love with this dining set I am glad you decided to change it one last time. It makes me want to repaint my set………..but that’s not going to happen 🙂
LikeLike
Thanks Vicky! I know what you mean!
LikeLike
Gorgeous.
LikeLike
Thanks Toni!
LikeLike
Hi Susan, well you’ve done it again. I love the color that you chose, and the chairs are perfect. Don’t think this will last too long. Great job!
Jeannie
LikeLike
Thanks so much! I hope it doesn’t last long!
LikeLike
It’s so pretty! Looking forward to seeing it at Lucketts!
LikeLike
Thanks Deb… The way I’m going it might be the only thing… Yikes!
LikeLike
A stunning set Susan and that fabric coordinates perfectly! I am so looking forward to seeng you at Lucketts!
LikeLike
Thanks Sharon! I’m hoping I have enough stuff to show at Lucketts! Looking forward to seeing you there!
LikeLike
Wow! That was a ton of work and you did an amazing job. Totally prefer the Duck Egg Blue to Provence myself.
LikeLike
Yes it was Susan… and I prefer Duck Egg too..
LikeLike
Reblogged this on Whimsy Burd and commented:
I am confused what was your mistake? I think it looks great!
LikeLike
Thanks so much… But I guess my mistake was the first color I painted the table, Florence instead of Duck Egg.
LikeLike
Yeah, I can not tell you how many times I have painted over a color. However, it is worth it in the end. Keep up the good work.
LikeLike
It’s just such a pain.. and quite frustrating but I understand that sometimes it will go that way! Thanks for stopping by!
LikeLike
Your set looks very updated and pretty.
LikeLike
Thank you so much!
LikeLike
You are one hard worker. You can see all the wonderful detail and time you spent. Just moving the furniture outside for a picture was a lot of work for me.
Momsie
LikeLike
Thanks Mom 🙂
LikeLike
Beautiful I love it 😉
LikeLike
Thank you so much!
LikeLike
You so made the right choices this is going to sell very fast and I so do hope you price for all your effort and let’s talk chairs from the brush painter side, it feels like the never ending road trip! Until you do it know one realizes your effort. This is gorgeemegussy
LikeLike
Oh yeah.. Those chairs were a huge pain! Thanks for liking the set Kathryn!
LikeLike
So labor intensive … but so worth it!
LikeLike
Thanks Connie! I think chairs are such a pain to paint!
LikeLike
PRETTY! I love the way it turned out finally. 🙂
You must be glad that you went ahead changed your mind.
Have a great week!
~Liz
LikeLike
Thanks Liz, and yes I am so much happier with the end product!
LikeLike
Wonderful job – I love the duck egg blue. I just redid some dining chairs and made a few tweeks myself. This is a great transformation! Hope you can stop by the enchanted oven.
xo,
Lisa
LikeLike
Thanks Lisa! I’m totally stopping by 🙂
LikeLike
I’m always so impressed with the fabulous transformation you talented ladies do with paint and the finishings in such daring colors! Just great!! Have a nice St. Pat’s week.
FABBY
LikeLike
Thanks Fabby! I hope Duck Egg wasn’t too daring 😉
LikeLike
I have been wanting to paint my dining room set
the exact blue but have been afraid to.. I think you
just gave me the inspiration I need…
Beautiful work and the back of the seats are
perfect….
Sandy
LikeLike
Oh you should do it! I love how it turned out, I think you will too 😉
LikeLike
This is fabulous. I love the colors and the fabric your chose for the seats. Thanks for sharing & blessings to you, Patti
LikeLike
Thanks so much Patti! It was certainly a labor of love!
LikeLike
Susan, Gorgeous dining room set! Love the duck egg and the upholstered backs.
LikeLike
Thanks so much Deb! I guess it was worth all of that work.. 🙂
LikeLike
OMG! This remodelling is far better than the original. I love the form of table and chairs.
You did a great job. TY for sharing as I am having a project this Spring (when it’s a bit warmer days).
Happy Tuesday & TTT..
/CC girl from D´Box in Stockholm
LikeLike
Thank you so much! I love this set too
LikeLike
Fabulous transformation. Thanks tons for joining TTT. Hugs, Marty
LikeLike
Thanks Marty! You always host a great party!
LikeLike
what a gorgeous set! i love the way you covered the chairs!
LikeLike
Thanks Cassie.. I know you know the pain of painting chairs too 😉
LikeLike
Stopping over on your blog and following you back! Love love love all of the furniture makeovers you do! Everything you upholster looks amazing! I need to learn how to do it and piping… that looks hard.
LikeLike
Thanks Reeves! The piping is not hard, just time consuming (for me at least).. I am taking a second upholstery class so I’m getting lots of help 😉
LikeLike
It turned out quite beautiful. I honestly thought the first attempt was very pretty too. Love the attention to detail on those chairs….which ARE so much work! That fabric is perfect & the padded backs on the captains chairs really makes a difference. Just an overall beautiful dining set!
LikeLike
Wow! Thanks so much Stacey, I’m glad you love them too 🙂
LikeLike
Oh sooo much better the second time around…love the color now!!! Wow you did an amazing job! Come link up to centerpiece Wed on my blog Style Sisters http://thestylesisters.blogspot.com/2013/03/centerpiece-wednesday-and-wrap-up_12.html
Karin
LikeLike
Thank so much!
LikeLike
Yes, better. I like the way you did black on the back of the captains chairs. It all look really great!
I found you today thru the From My Front Porch – Treasure Hunt Linky. I hope you get a chance to stop by my blog and leave a comment, too!
~ Megin of VMG206
http://www.vmg206.blogspot.com
LikeLike
Thanks Megin, I sure will!
LikeLike
Wow what a great redo that is! Just beautiful. Love the color and the fabric! Great job!
LikeLike
Thanks Sandra! I stopped by your blog and am your newest follower!
LikeLike
It must be hard to let this set go, it turned out beautifully. Thanks for all the details on how to recover the chair backs.
Traci
LikeLike
Thanks Traci! It was hard for me to find a good tutorial on covering cane backed chairs so I thought I would try to write one up!
LikeLike
This turned out beautifully! The colors and fabric were just meant to be, and I love the upholstery techniques you used to give the captain’s chairs even more flair. And I have to admit, I instantly fell in love with the duck egg color in your “do over” photo. Gorgeous!
LikeLike
Thanks Jenny! It took forever, but I do like the results!
LikeLike
Wow! So pretty! I really love that fabric. I’m new here…do you have tut on double welting?
LikeLike
Thanks so much Christine! I don’t have a tutorial, but this website has a good one! http://prudentbaby.com/2010/09/prudent-home/how-to-make-double-welt-cord-2/
LikeLike
Niceeeeeeeeee……..wow
LikeLike
Hi. I am doing the exact table and chairs (2 leaves as well!!!) in black and white w/ a damask stencil down the front of the table top. Labor intensive doesn’t begin to cover it! LOVE your idea of the padded back on the captains chairs. I am sooooo ready for these chairs to be over and done with! LOL. I know you can relate. I’m just curious (if you don’t mind me being nosy!) at what price you listed yours? Did it sell quickly? I can’t wait to get this out of the way. It’s such a space hog! Never again, I don’t care how good of deal I get! I have it listed under my blog under “In the wings” if you want to take a gander!! Thanks so much.
BTW, I love how yours came out. I might have copied your colors if I saw your’s first!
Beth
LikeLike
Thanks so much Beth… And yes it was a huge pain in the ass! I know my set is listed slightly higher than it might sell for, but if you look on Etsy it’s priced reasonably. I’m hoping to sell it for at least $1,000 though because of all of the time and expense involved…. I hope yours sells fast!
Susan
LikeLike
Nevermind!! I just went to your for sale page and got my answer!!! Awesome. I was going to list it at 900 and thought maybe it was too much! All the sweat I put into that thing, it should go for 10 thousand!! LMAO
LikeLike
Love this! Painted my chairs Duck Egg today, and it almost exactly matches my kitchen walls. UGH! Too match-y, match-y! was wondering how graphite would look. Looks amazing! Thanks for the inspiration!
LikeLike
Thanks Becky! I love Duck egg and I hate painting chairs.. I may paint the walls instead 😉 good luck!
LikeLike
Hello,
Was wondering if that beautiful robins egg blue dining table and chairs are for sale? You did a beautiful job at redoing it.
Thanks,
Jill walker
LikeLike
Hey Jill! Sorry but it sold last week! Thanks for looking though..
LikeLike
Hope this hasn’t already been asked, but roughly how much fabric did it take to make recover the arm chairs, bottoms and top?
LikeLike
Hey Kelly, I really don’t remember how much but if I were to guess each base would be a little more than 1/2 a yard and the tops a yard in length but only half width of the fabric.
LikeLike
Thank you! I have this exact same table (minus the arm chairs) that I just traded for some embroidery work! I can’t wait to make it my own!!
LikeLike
did you use a regular desk stapler or a heavy duty stapler? I have a set just like this I want to recover where the cane backs are broken. thanks!
LikeLike
Hey Debbie, I used a professional grade electric stapler. They use very fine staples that easily penetrate the wood.
LikeLike
Love it! I’m currently looking for a french style table to redo and the ones I’ve found have the cane back chairs which I’m not a huge fan of so thanks for showing how you dealt with those.
LikeLike
No problem! Thanks for stopping by!
LikeLike
Love what you did with this dining set. Great way, too, to transfer those cane back chairs. Thanks for the super ideas.
LikeLike
Thanks so much!
LikeLike
How many coats of graphite and which wax (clear or dark) and how many coats of wax? Thank you!
LikeLike
Melissa, this was some time ago but I usually only had to do 2 coats of ASCP on my pieces. I would have waxed this with a clear wax, not dark.
LikeLike
One coat of wax should do it if you apply it well.
LikeLike
I loved the other blue you used, but I do think the Duck Egg looks better on this dining set – it doesn’t look so ‘in your face’ – if you know what I mean and I think it’s because you have six chairs and it’s a large table – the Florence perhaps would look better on a smaller piece of furniture 🙂 I think the fabric is fabulous and goes so well with the Duck Egg 🙂
LikeLike
I had to look back at this one to remember it! You are so right the first stab at it was a little harsh!
LikeLike
This table is my inspiration for the French provincial table I just bought for our home..beautiful work if you don’t mind me asking were did you buy that fabric at?
LikeLike
Thanks Jeremy! I purchased the fabric from Fabric.com. You can see the name on the sticker on one of the pictures of the fabric.
LikeLike
Sorry – sort of late to the party on this thread, but I love the table and chairs. I have wicker back chairs and an ugly dining table (circa 1980…) that needs serious help. This inspires me. Did you need to do anything special to the wicker backs in order to make the spray paint adhere and last?
LikeLike
I used Annie Sloan Chalk paint so I didn’t need to do anything special to the wicker, but it I were spray painting them I would use a high quality spray primer (like Bin Zinsser) before spray painting them. Good luck with updating your set!
LikeLike
I have a similar Thomasville table that I want to repaint. My table top has an inlaid criss cross pattern that I don’t want to show through. When you painted your table top could you see the wood grain? My table top looks like this table https://sk.pinterest.com/pin/572942383815542149/ Do you think if I chalk painted the top would it look bad?
LikeLike
The wood grain does show some on the top, but it isn’t as noticeable as when it is unpainted. I used chalk paint on mine, but priming it with a thick grain hiding primer would help with hiding the grain.
LikeLike
Great Job! I am trying to do something similar with my table. Yours is beautiful
LikeLike
Where to buy the cane for the chair back
LikeLike
I have that same dining table set & I love the colors. U just showed me what to do. I thank U from the bottom of my heart.👏👏👏👏
LikeLike
So glad I could help! Good luck with your set!
LikeLike
Beautiful. I am new to chalk paint. Have a similar set and I want the table top to be a washed gray look. Did you use chalk paint on the table top?
LikeLike
Yes I did use Annie Sloan chalk paint on the top.
LikeLike
So many comments on a lovely set! I didnt read them all but I have a question. What kind/size of batting is that in the roll and is that what you would still recommend for a project like this? I love your covered cane idea and plan on copying it. Thank you.
LikeLike
I’m not sure how big the roll is, I bought it from an upholstery shop and I still have some left! It’s just a non cotton batting, nothing special and easy to find, yes I would do it just like this again today.
LikeLike
Soooooo gorgeous!!! I have 2 Caine chairs I want to paint and possibly re-Caine!! You gave me such inspiration!!! I’ve never done anything much like this but….want to give it a shot!! Wish I could show you my pics for advice!!
LikeLike
Hey Janet, thanks so much! Feel free to send me an email and some pics, I’ll help if I can!
LikeLike
I just got a set with the same type backs on the chairs. But one is damaged pretty bad. Would the covering still work?
LikeLike
It may, but you can always strengthen it up with some chair webbing pulled tight and stapled well to the inside of the chair.
LikeLike
This is the best cane backing transformation I have seen. That double welt cording just really finishes it off. Great idea and awesome job!
LikeLike
Thanks so much Jo!
LikeLike
Hi! I have chairs with the cane back that we had to take out because they were damaged. I have a couple questions in case you can answer them please:
1) The chairs are made of metal so what is the best way to attach the fabric and cushiony part if I can’t use staples? Any particular glue?
2) Since there is no caning for reinforcement, what material do you suggest to put in so that the fabric doesn’t get pushed through when someone sits against it?
LikeLike
I would reattach the fabric etc the same way the caning was attached if possible. I am not sure how they would have attached caning to metal unless it was wrapped around the metal? Typically one would use webbing, burlap and/or a thin cardboard type material (can’t remember what it is called) to ensure the back is structurally sound but you would still need a way to attach these to these chairs. Feel free to contact me at directly with photos I can see if I can try and be of more help!
LikeLike
This table is so cute! I love it so much. I have been looking for something like this to freshen up our kitchen! We are doing some kitchen cabinet refinishing next week and after that I would love to try and make these. Thanks for sharing!
LikeLike
How much fabric was needed for this project including front, back and cording? I have an almost identical set with six chairs. Love the way your efforts transformed the set!
LikeLike
Hi Mary, I’m sorry I just don’t remember that number, I finished that set so long ago. The easiest way to determine how much you will need is to measure each chair. I wish I had a better answer for you!
LikeLike
Great reading your bblog post
LikeLike