This bathroom belongs to our middle daughter Cassidy, who is a Sophomore at Radford University this year, she’s rarely home but her bathroom needs updating for sure! Her bedroom has it’s own bathroom and her bedroom/bathroom combination is sometimes referred to as a “Princess Suite” by some builders. I like the term so I’m going to refer to her bathroom as the Princess bathroom ‘kay?
Here is a picture of the bathroom on our walk-through day. It has gold sort of nautical rope print wallpaper with coordinating valance and shower curtains (with boats on them) someone certainly paid a lot for this look at some point. While this is a cute nautical theme it’s a) a little much for me and b) not quite what a 20 year old girl would like either… other than that the bathroom is not too bad!

Step 1 & 2 was to remove the valance and shower curtain, I sold them on Craig’s List for $20 to a mom with a little boy who is just going to love his little boats!
Step 3 was to remove the wallpaper, which I was expecting to be easy and come off in great big sheets like the other 3 bathrooms of wallpaper… well it did NOT!!! Pictured below was about 3 hours worth of wallpaper removal because they didn’t paint the walls appropriately before they papered!!! Please people properly prepare your walls for wallpaper!!!

My original plan was to install board and batten (like we did in the master bathroom) and paint the top third of the wall, but the wallpaper removal tore the crap out of the walls (that’s my technical term) and I just decided to finish the walls the same way we finished the other girls bathrooms. See I can be flexible… however this left me with all white planked walls and I really wanted some color in there so I rolled a quick coat of Benjamin Moore’s Palladian Blue on the ceiling, which I had on hand from painting my two front porch ceilings… and yes I used an exterior satin paint inside and I think it looks gorgeous!

There is also a little linen nook in the bathroom, where we are adding nicer shelving, which I painted the same color as the ceiling.

Now as to the floor, seriously I could have left the 8×8” white tiles, but I HATED them and their stupid stained white grout. So I removed them with my hammer drill (super easy just use ear plugs and eye protection for sure) and was left with the underlying mortar to remove.

I was also left with a large hole near the tub, but using a grinder I proceeded to remove the mortar to make a smooth surface for the new tiles to stick to. I could have used a self-leveler over the existing mortar (I think) but the mortar bed and lathe were already adding 1.5” to the height of the floor and I didn’t want to add anymore. By the way the grinding of the mortar was AWFULLY messy and I hated it and I’m pretty sure I won’t do that again if I can help it.

I stopped here because this hole was really bothering me… how do I fill it? Can I just pour new concrete in here, level it and that would do? Well based on my many hours of research the answer could be yes, could be no… seriously the web was not very helpful in this case.

In the end I decided I’d rather be safe than sorry so I removed all of the concrete and lathe with my trusty and much loved hammer drill (which took about 45 minutes) and got the surface back to the subfloor. Now I can start from scratch and feel confident in the job I’m about to do!

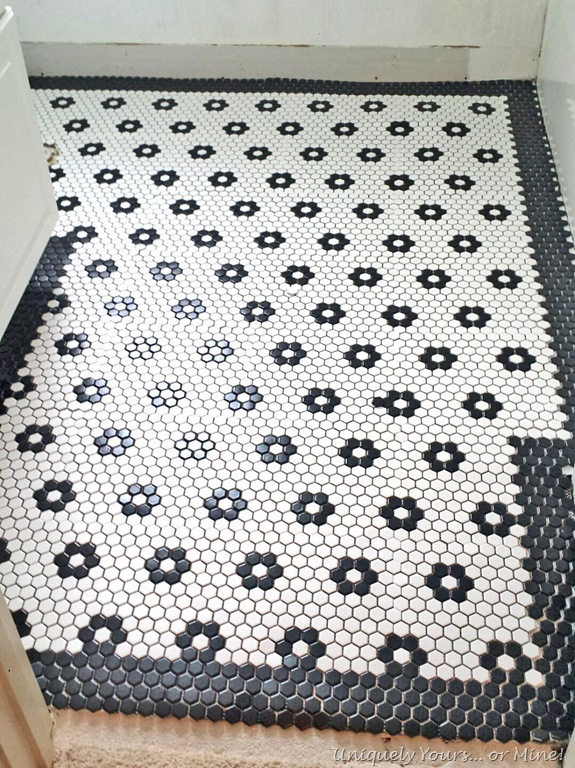
I purchased this pretty white hexagon tile with black flowers and a box of just black hexagon tiles to create the border around the room. All of our girls had b&w mosaic tiles in their last bathrooms and I just really love the classic look of them. I did a dry layout on the bathroom floor to ensure I had the look I wanted and enough tile for the job.

I then moved all of the tile out of the bathroom to an out of the way place in the bedroom, trust me these steps will save you when you go to actually lay the tile.

We’re also installing a new top on the vanity. I did look into replacing the vanity entirely, but it was cost prohibitive and this one is in very good shape anyway.

I made a trip down to the stone yard and perused their remnant slabs for options. I went there thinking I’d want something light-ish with some white and gray, but when I saw this slab I stopped and said this is the one! I was not envisioning a black top, but I’m totally digging the idea! This is honed Negresco Granite and it looks a little like soapstone.

The cash and carry price for the top (including an under mount sink) was $410, which I think is pretty good for a 44” long granite top, the only issue is they cut the backsplash a tad long and I need to take it back and have it re-cut…

So that’s where we stopped for now, we’ll be working on installing the concrete backer board on the subfloor next so we can move forward with the floor tile installation!
Until next time!!


Love seeing your step by step process; I’m sure your daughter is going to love it; you have a consistent theme through out your home which has fluency and flow! KEEP UP THE GOOD WORK! (I can see it comes naturally for you; its a pleasure to watch) Thank You so much for sharing!!!:))
LikeLike
Thanks so much for the support Tina, I really appreciate it!
LikeLike