This post is really part 3 of the bedroom update that we have been working on (see 1 & 2 here). The closet area is the biggest change we made to the room, the rest was really just paint and decor… which I will share with you soon…
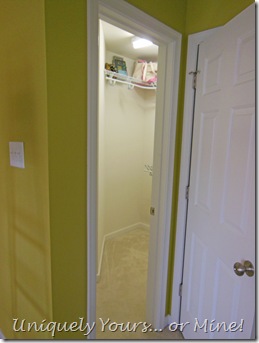
As you can see below she had an awkward setup of this space. The vanity door and closet door butt up to one another and the whole thing was just a tight mess! The closet itself is a nice size walk-in, it was just not setup to function as well as it could.
She also had wire shelving in her closet and the overall setup of the shelving was not ideal… why would they stop the bottom shelf 8 inches from the wall… I just don’t understand!?
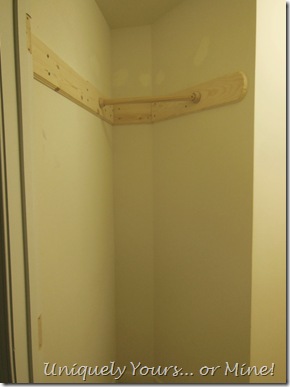
My SAH (Super Awesome Hubby) and I removed all of the shelving, slightly reworked the setup and installed wooden shelves & rods… oh yeah, and filled the million holes left by removing the wire shelving… so much fun!
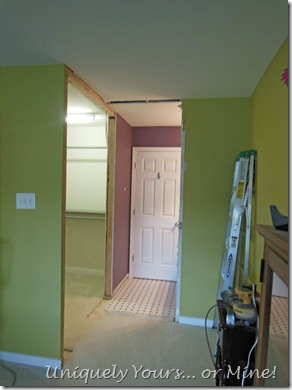
We also removed a large portion of the closet and vanity wall, including both door frames. We also added a light fixture in the ceiling just outside the closet and rearranged the light switch locations to be more functional for the new space.
We removed all of the carpeting and ceramic tile floor in this area in order to help tie these three spaces together… The removal of the tile floor and its underlayment was a sucky job, we used a hammer drill with a spade bit and it still took us FOR-EV-ER! And while I’m complaining let me say that removing the 5,000 staples that they used to tack down the carpet padding with was no walk in the park either…
No pain no gain right? Here is the much loved AFTER, although we still had not installed the shoe molding at the time I took this photo.
The new lighting we installed gives us so much more light and makes the dressing room feel like a showroom… LOVE!
The stencil I painted on the wall was a HUGE pain because it was so big and flimsy, but I love how it gives the wall a sense of purpose & design!
Now the closet is stocked and ready to use! My vintage doorknobs are up and being utilized… yay! She has so much more room for her clothes now…
I found this great wall mount wire basket at Home Goods and set it up for gloves, hats etc… The basket above the dresses I use to store her blankets… she LOVES her comfy blankets, but I keep them up high so she doesn’t get all of them out at once!
I used one of the antique armoire doors I updated… I added a french cleat to the back of it and hung it up at the perfect height for her to see her entire outfit in the mirror. I also updated her “BRIE” letters with a coat of silver spray paint and some silver German glass glitter… very bling bling!!!
I had a very difficult time deciding what to do with her shoes, so for now I’m using this soft woven basket I found at Target. I am storing all of her summer shoes in a basket under the bed and only her winter shoes go in here… that way she is not digging through all of the shoes to get to the pair she wants. This is just a temporary solution until I see how she is using the area, but it seems to be working great so far.
One of my favorite changes is the addition of the grey floor planks. The flooring is from the St. James collection, “Flint Creek Oak” purchased from Lumber Liquidators. It has it’s own padding attached and it was very easy to install!
This is the view from her bedroom, looking into her new dressing area! To help define the space as a “room” (and to add privacy if needed) we installed at the entrance a wood rod, molding and a set of grey velvet curtains.
I still need to fix a few issues with the way the curtains are hung (removing the clips and adding ties), I also need to stencil some numbers on the baskets on the top shelf in the closet… quick & easy things to do, just need to get to them!
I am super thrilled with the way it turned out! Brie and all of her friends love it too (whew!) I know it may seem a little sophisticated for a 10 year old, but she will be able to grow into it quickly and I will not need to update her room again… a big plus for me! There may be a few items that will get changed out between now and the time she moves out, but the overall feel of the room will stand the test of time I think…
I hope you like her dressing room make-over too… I really feel like we took an awkward closet space plus an unused area and turned it into a wonderful dressing room that feels roomy, organized and beautiful!
Thanks for stopping by…
Until next time!
Linking to these parties
Between Naps on the Porch, Coastal Charm, The Dedicated House, A Stroll Thru Life, From My Front Porch to Yours


Brilliand I love this and love the chandelier.
Cynthia
LikeLike
Thanks Cynthia! I love being able to repurpose things when I can!
LikeLike
Looks superb! Great job!
Javeriya http://believeninspire.wordpress.com/
LikeLike
Thanks Javeria! It was a lot of work, but so worth it!
LikeLike
It does look beautiful. Great job!
LikeLike
Thank you so much! My daughter is enjoying it!
LikeLike
Very beautiful!
Thanks for sharing.
Hope to see you on my blog:)
Happy Holidays and Warm Seasons Greetings from Singapore~Sanghamitra.
LikeLike
Wow! It looks super amazing! Love how you transformed everything into something beautiful, functional and makes sense.
Very much love the flooring. May I ask what paint color did you use in the room? Very much like the gray.
LikeLike
Thanks Julie! I had Benjamin Moore color match Pavilion Grey by Farrow & Ball. It is a gorgeous soft grey color, warm, not cold! Thanks for stopping by!
LikeLike