Well, we are still in the middle of other renovations (as usual) but we have been using our newly renovated primary bathroom for a couple of months now. This TINY bathroom (at 4ft x 8fT) was once setup as a Jack & Jill bathroom, being shared by two bedrooms, which really made it even smaller with the two doors. I knew I needed this particular bathroom to be as special as I could make it due to its small size and I think it is pretty special indeed.

When I first walked this house my favorite part of this bathroom was the TINY window and the beautiful black and white Art Deco floor tile. I even considered trying to reproduce it for the new design, but at the end of the day I didn’t like the black/white/green combination.
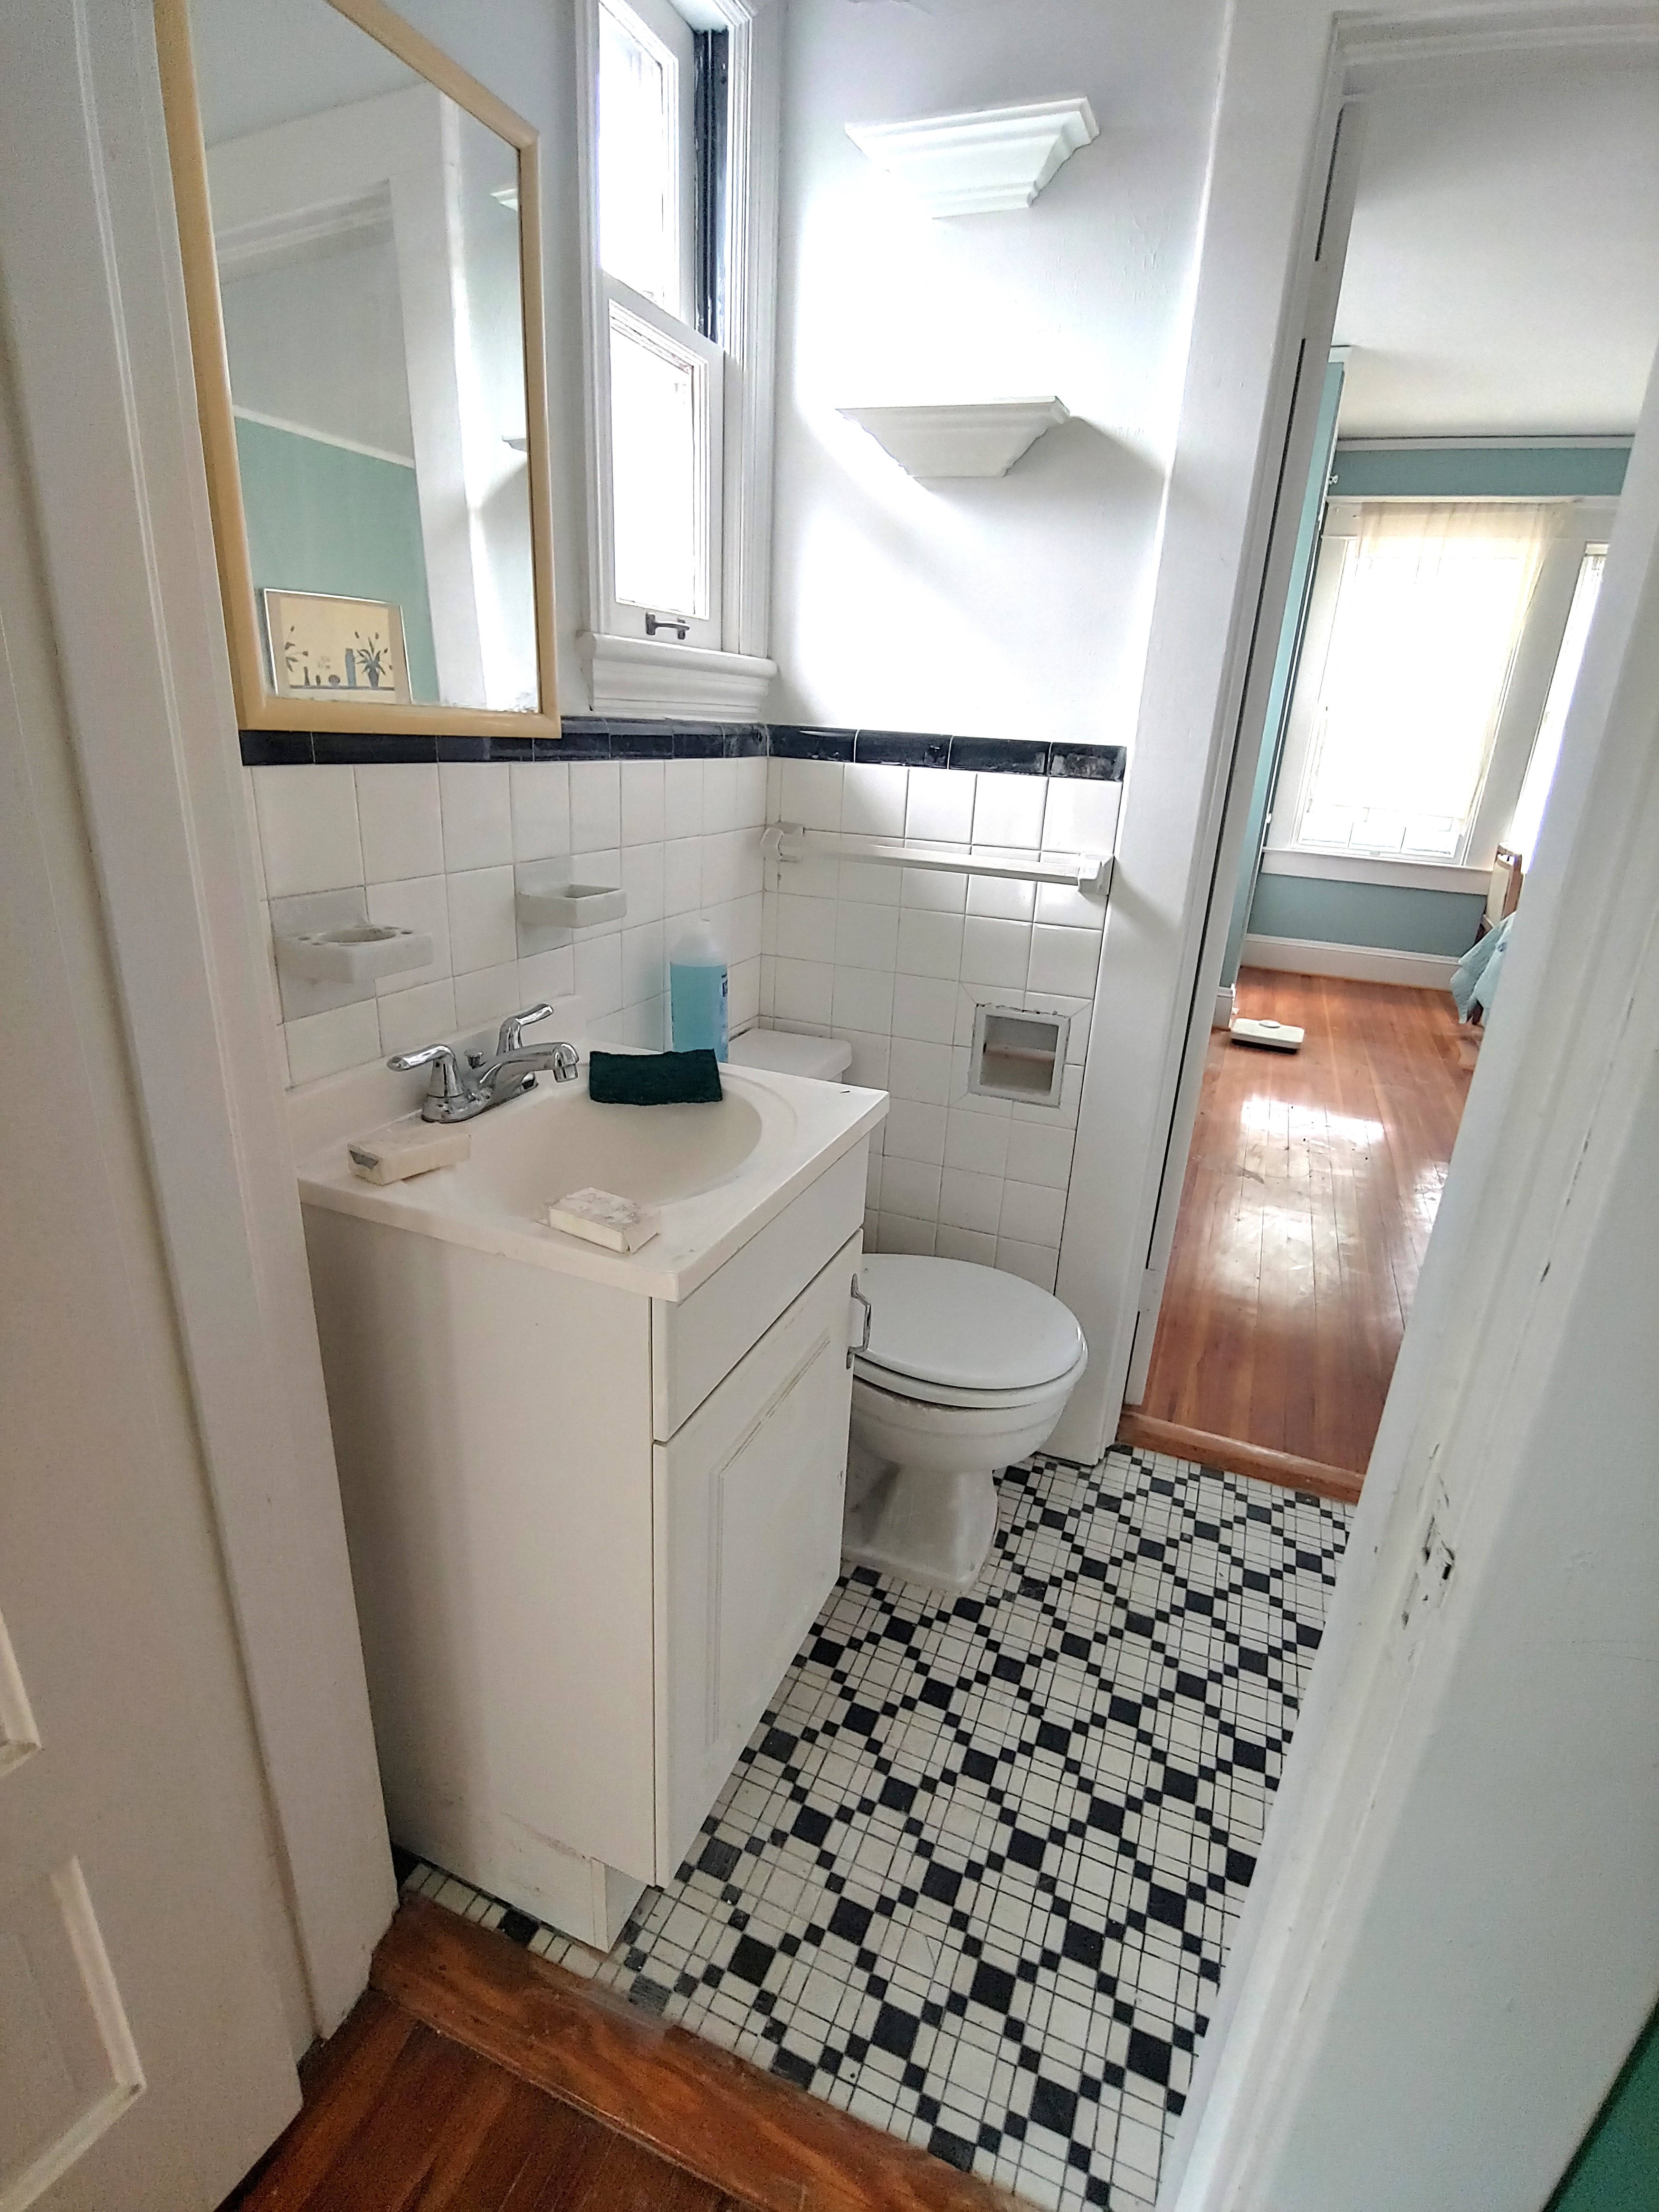


A couple of things to note, this bathroom (our house was built in 1923), is not original to the home. Based on some old newspaper clippings I found in the wall cavity it was probably built in the late 1950’s by “stealing” closets from both of the adjoining bedrooms. The bathroom also backs up to a hall closet, which is where we stole just enough space to add a special shower feature. While we could have made the small adjoining bedroom part of a nice, large bathroom losing a bedroom was not worth it to us.
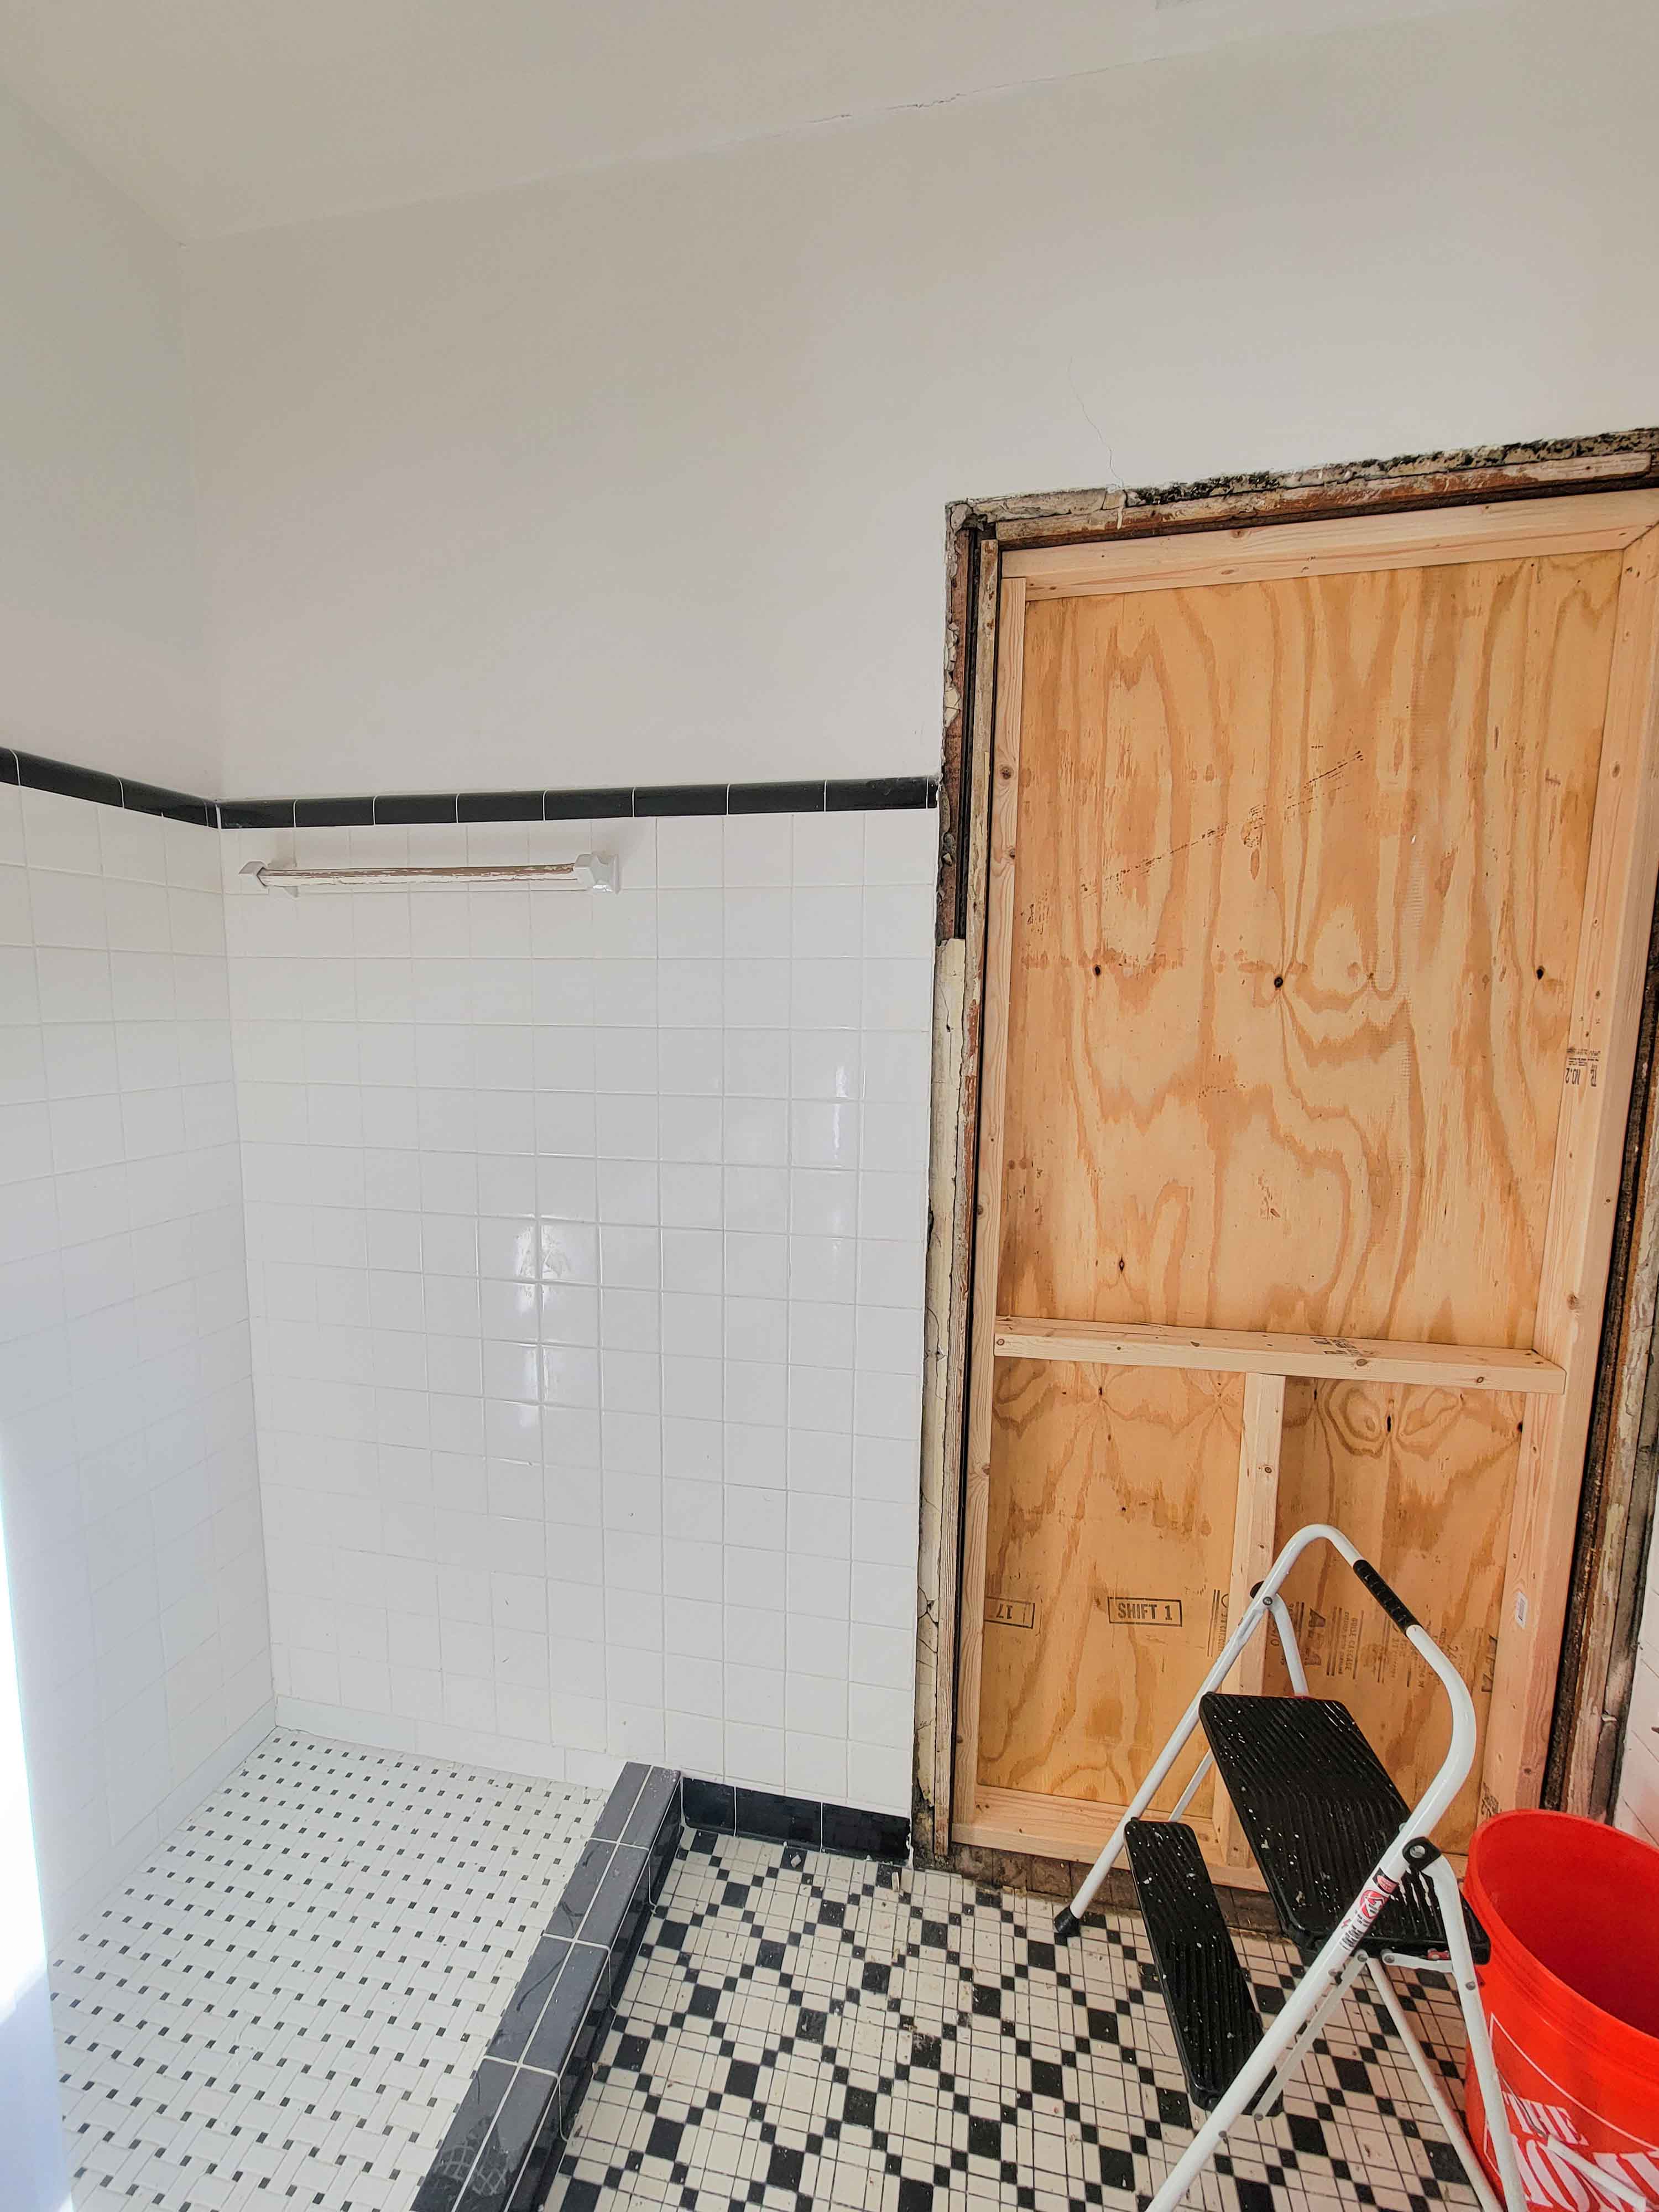
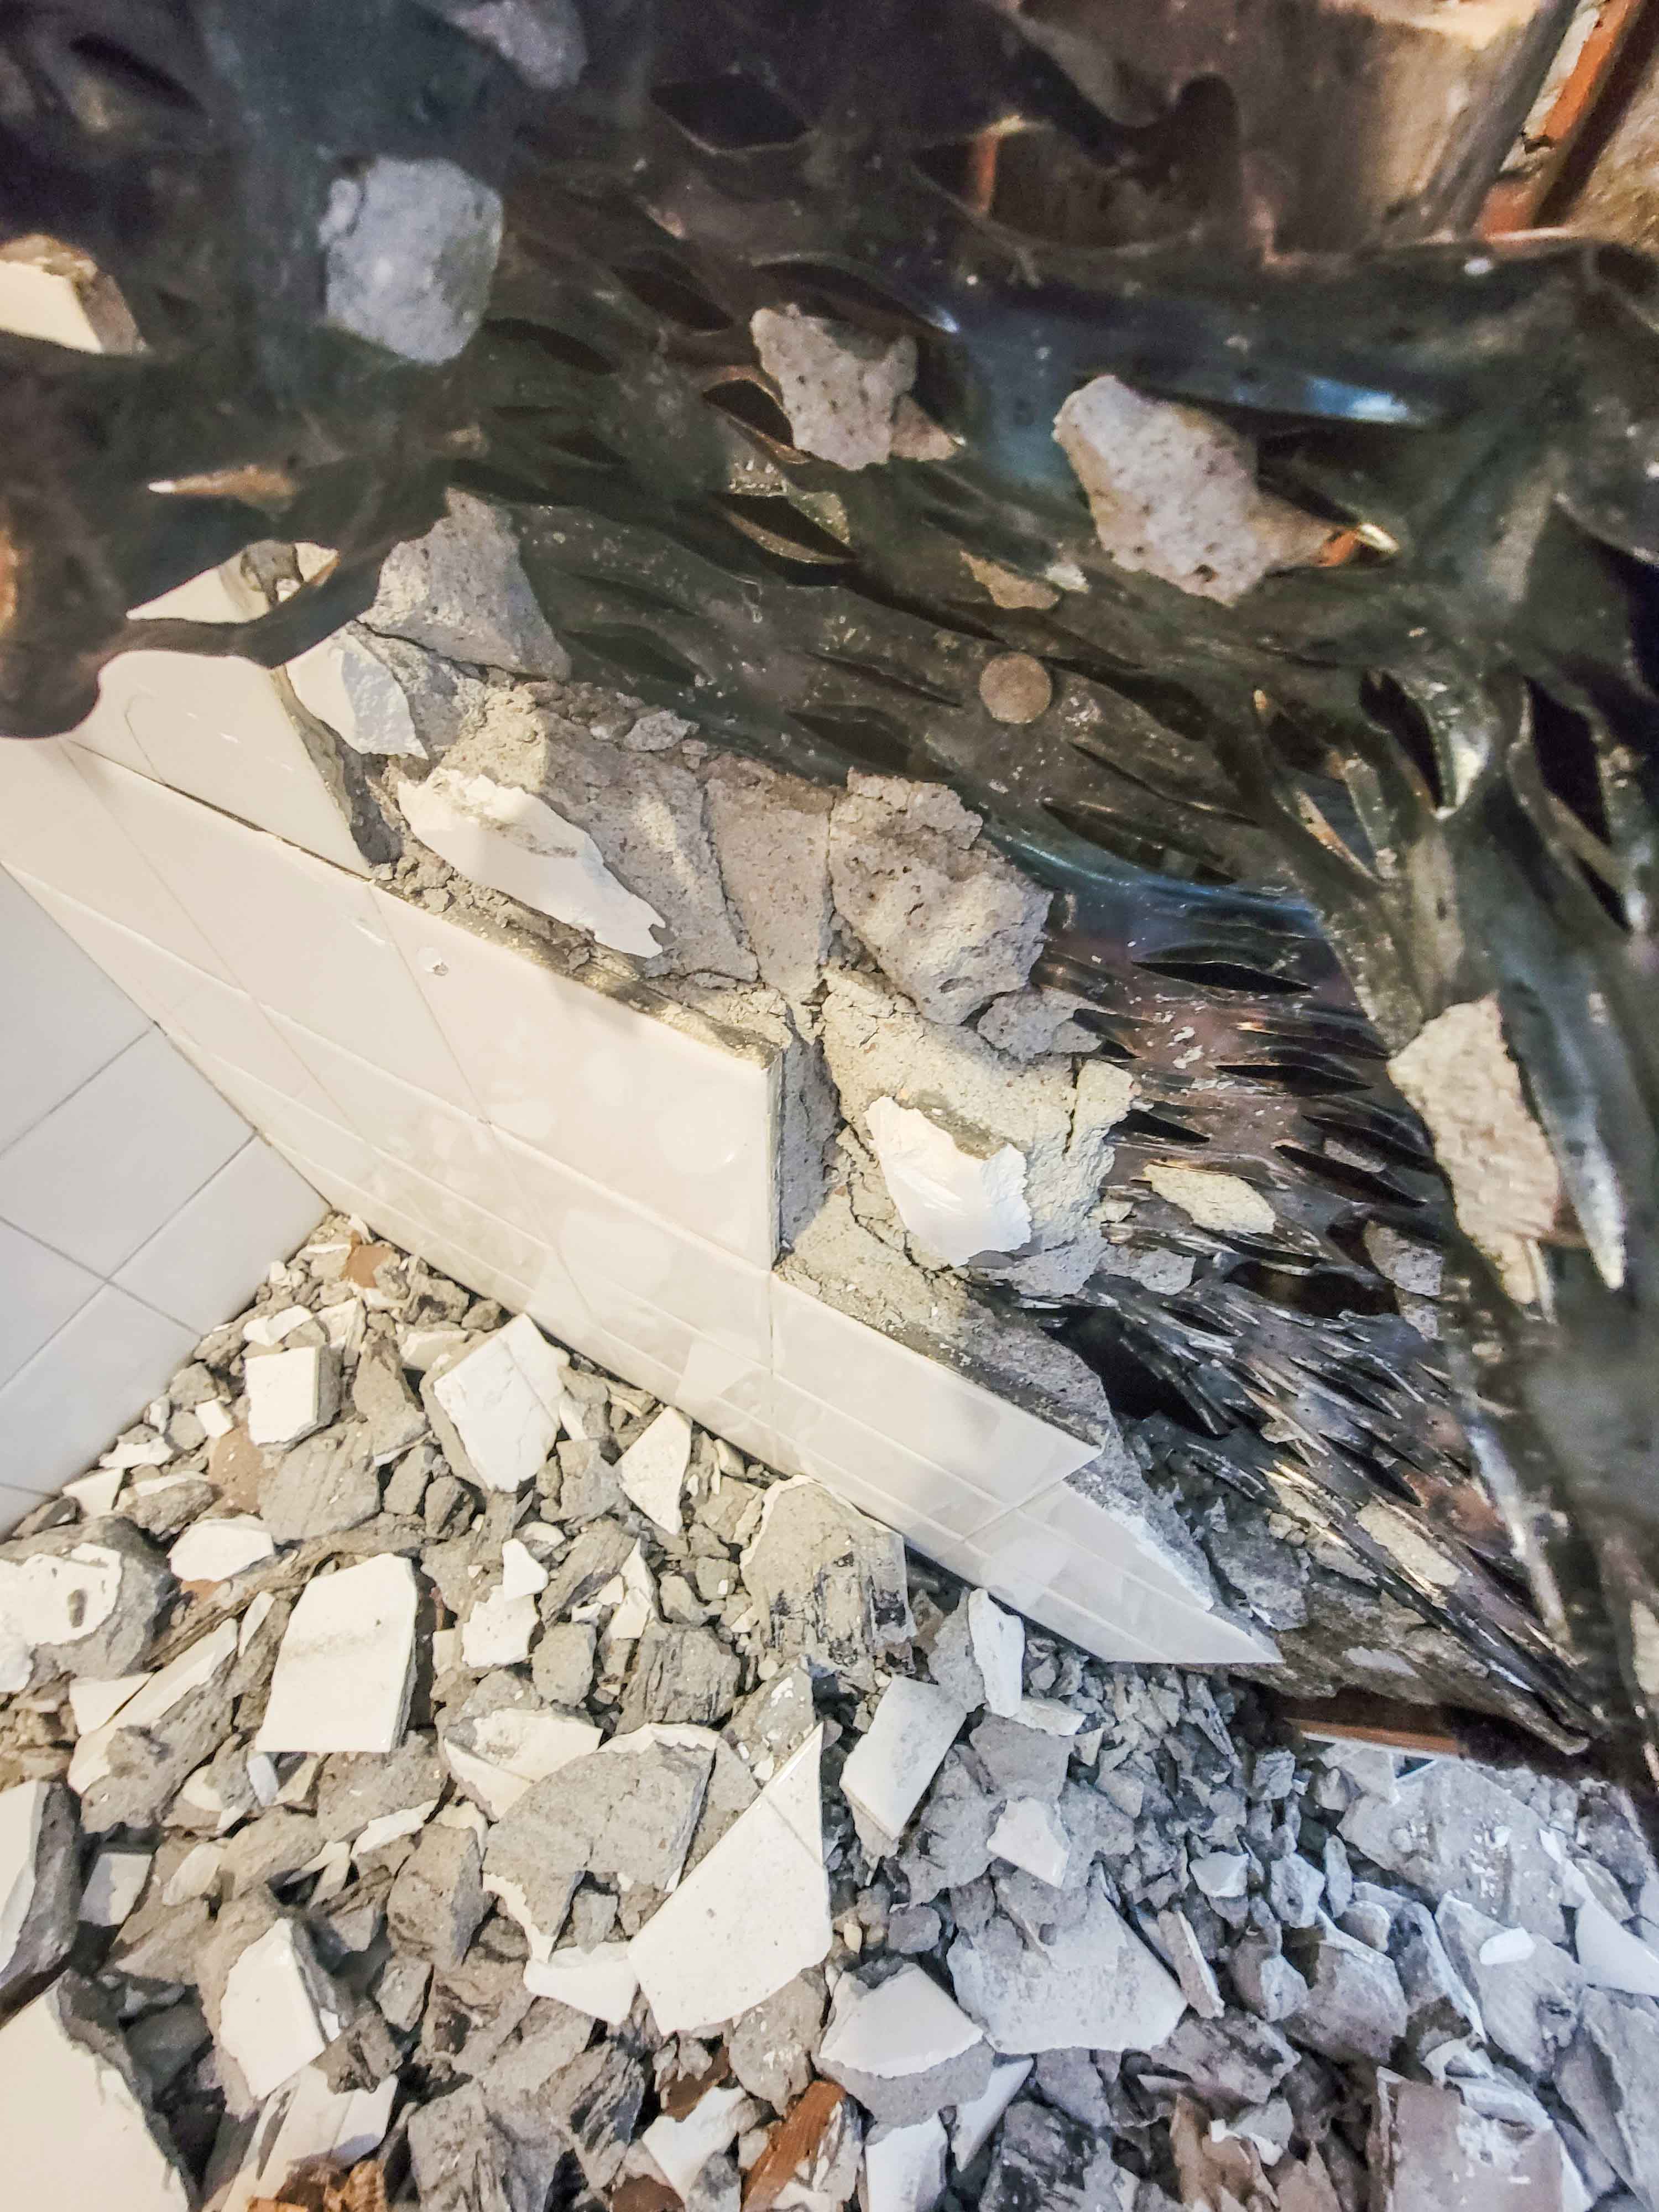
This demolition came with quite a few not so fun surprises. We demoed the walls first which since they were tiled, the lathe they used to hold the troweled-on mortar was metal and was a BITCH to remove. I researched the best way to remove it and the best I found was “good luck” and “hope it pulls off of the wall easy”. Spoiler… it did NOT pull off of the wall easy and we had to slowly chip away at the 1.5″-1.75″ of concrete and tile to then be able to pull off the lathe, thank goodness this was a small bathroom.


After the wall demo, we then started demoing the floors which (I kid you not) was four freaking inches of mortar sitting on top of wood planks attached to the floor joists. We used a hammer drill with a tile removal bit and then a concrete removal bit, it took FOREVER but was the absolute best option for removal for us. I am so glad we took all of this out as the shower clearly had had a leak for some time and was repaired recently but they didn’t do anything about the rotten floor joists.

So having ripped the bathroom down to the studs and joists we had a few more items we needed to address prior to our contractor taking over (did I mention that it would have cost us $4k to have them demo the bathroom?).
We added a wall mount bath fan, we have no eaves and a concrete tile roof, so we didn’t want to vent it through the roof and had an option to vent it through the siding if we wall mounted it. That was a pretty easy job due to the flat sunroom roof next to this bathroom it didn’t require a tall ladder for access.
We pulled up four new electrical wires in the now accessible chimney chase, two 15 amp and two 20 amp to power the entire upstairs as there was only one circuit at that time. This was done in anticipation of the electricians coming in to remove all of the knob & tube wiring and rewiring the whole home. We added the new led ceiling lights and electrical boxes for the lighting, outlets and switches.
We also added blocking for all of the items like towel holders, mirror & the sink as well as laid out the space for the new niches. After all of that we then added Rockwool insulation to every wall in the room.
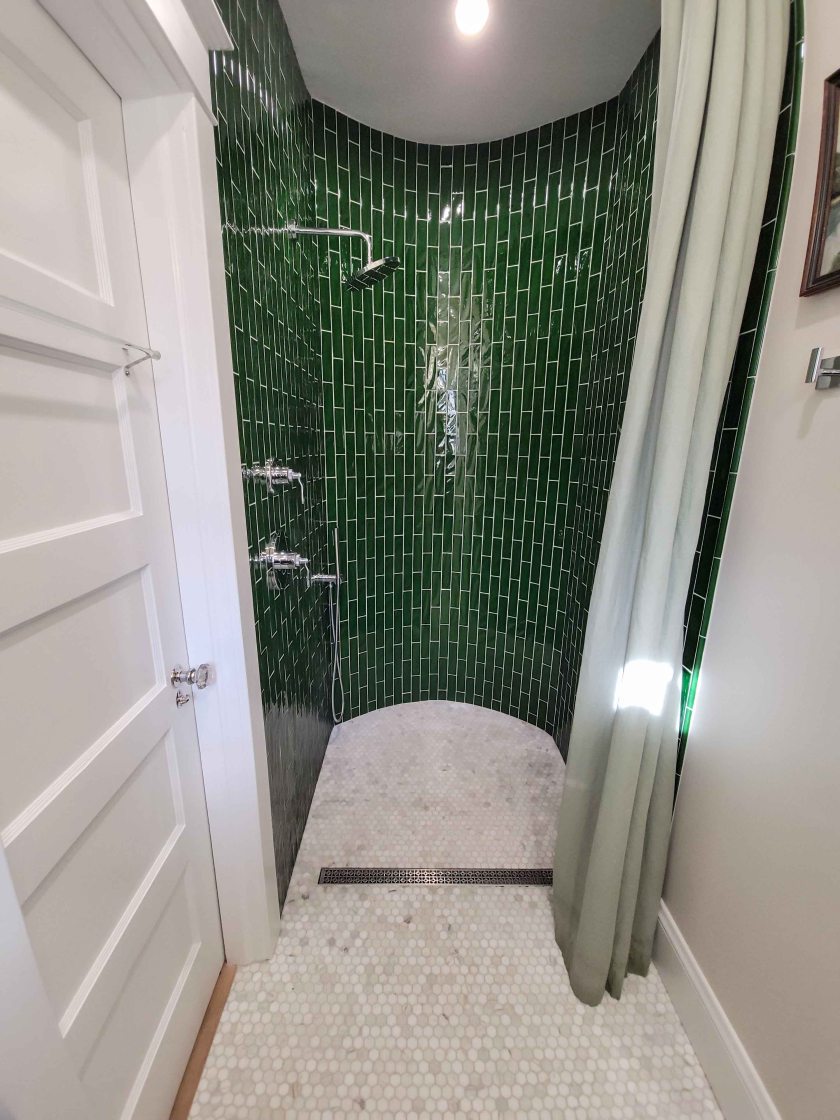
Now we were ready to hand it over to the contractors! They sistered the floor joists to ensure we had a stable floor, installed the subfloor, made the curved shower wall, installed the new plumbing, installed and finished the sheetrock and completed all the tile prep and tile installation on our CURVED shower wall! Curving this wall allowed us to have plenty of elbow room in the shower, while still allowing us to maintain enough room in the hall closet to still be useful, it is a win-win!


The tile contractor was meticulous and just knocked this job out of the park. The wall tile is 2″ wide and laid vertically in order to accommodate the curve of the wall. It took me forever to find not only the right size, but a consistent green color for this project.

Once they were all complete, we came back in and installed all of the woodwork, made and installed the cabinets for the niches, installed all of the electrical fixtures and painted. I can tell you we save thousands doing what we could ourselves and it really helped the overall budget and allowed us to achieve the end result we were looking for.

This curved wall is my favorite part of the project, and I am so happy with how it turned out!

We painted the walls are painted Benjamin Moore Ballet White, which has the tiniest bit of pink, but is mostly a light taupe and coordinates well with the honed marble floors.
I love the green pump bottles to coordinate our soap & shampoo. My hubby says he enjoys the shaving niche for washing his legs and feet, I will add this in all shower stalls in the future!
While we have towel hooks installed currently, but we have electricity in the area for a towel warmer in the future. I have been unable to find just the right one (not too modern, not too deep etc) so it will be a future add.
Our nice large “medicine” cabinet holds so much, and we also have an outlet in there for when we need to charge our toothbrushes. There is plenty of space inside with room for more shelves in the future if need be.

I stripped the original door but made new trim exactly like the trim in the rest of the house. The glass towel rod is vintage, but new to me and true to the era of the house. The niche beside the door we made with the extra room we had in the chimney chase. It is about 17″ deep, so there are actually additional items stored behind these baskets. We also store the extra toilet paper below the built-in toilet paper roll holder.
And last but not least, my favorite window! I added reeded glass film to the bottom (which is carried throughout the house as film or actual reeded glass) to ensure privacy as we are in the city and only a small driveway away from our neighbor’s home. I also installed new (but period correct) hardware to finish off the project.

Is the bathroom tiny, yes, yes, it is, but there is definitely room for two in the shower (I mean if that is your thing) and while countertop space is nonexistent the cubbies and cabinet have more space than I have items to store in them. Can I blow dry my hair while my hubby is also getting ready no, not easily, but we rarely get ready at the same time anyway, so this works for us.
Would I do this again you may ask, well yes, as we are currently working on the LAST upstairs bathroom, which is the main “family” bathroom where we are doing the same thing in just a larger scale. Is it a pain in the ass, also yes, it is! Is it rewarding to see your efforts pay off in the end, yes to us it is.
We love our home and hope that the love and work we are putting into it will be around for a long time.
Thanks as always for stopping by!


Hey Susan. The tile is stunning. Hope you had a great thanksgiving.
LikeLike
Another lovely project completed to perfection. I love your curved shower wall! Good luck with your future adventures and please continue to share with us; your posts are always a treat. Happy Holidays!
LikeLike
Thank you so much, it was a labor of love for sure! Happy Holidays to you as well!
LikeLike
Thanks so much Toni, I went through a ridiculous amount of samples to find it! I hope you and your family had a wonderful Thanksgiving as well!
LikeLike
Another gorgeous project competed to perfection! I love your curved shower wall and am in awe of all the little extras you design and implement for your projects! Thanks for sharing. I always enjoy your posts. Happy Holidays!
LikeLike