I probably shouldn’t have titled this a tutorial, maybe it’s more of a “this is how I do it” walk through… Either way I’ve had this table for about a year and a half (totally ridiculous)… I think I was a little intimidated by the amount of work involved… but better late than never right?
I took a fair amount of pictures throughout the process of refinishing this dining table so I thought I could share the steps with you, just in case someone is interested… so here it goes!
Step one…
Start out with a great vintage table (that’s the easiest part)…
BEFORE

Step two: Repair structural issues
We removed the top in order to fix the bad repairs that the last owners did…
We removed the top layer of added wood (which was visible on the outer edge of the table) and then the original wood side supports. The original side supports had to be replaced due to damage that was effecting the stability. My SAH cut and routered the inside edges of the new pine boards in order for the wood cross braces to join in as they were originally made to do… I was VERY impressed, they were a perfect fit!
(Underneath BEFORE)

I removed a leg that was repaired badly at some point before I bought the table. I sanded & cleaned the connection points of the leg and used Gorilla Glue and a frame clamp to attach the leg back to the base. The frame clamp was long enough to wrap around the entire base and I let the piece set overnight…

Step Four: Refinish Top
I stripped the top with CitriStrip and cleaned the residue off with 000 steel wool and Low Odor Mineral spirits. I let the top dry for a day or so and then sanded it with an orbital sander using first 150 grit sandpaper then finishing with 220 grit. The top is NEVER going to be perfect, but I did the best I could with what was there…
Step Five: Paint base
After cleaning the base with Formula 409 we painted it in two coats CeCe Caldwell’s Smoky Mountain Grey… a beautiful blue grey color!

Step Five: Stain Top
I applied the Kona stain with a soft cloth, applying with the grain, and let the stain soak in for about 15 minutes. After the 15 minutes I wiped the table down several times with paper towels removing all of the excess stain. Then I waited… a couple of days to ensure it was completely dry… the garage is cold, if it was a warm day I would have only waited 24 hours. If you add wax or a top coat before the top is completely dry the top product can pull up some of the stain and leave the piece blotchy… word to the wise!

This is one of my favorite products… Watco Danish Oil, I especially like to use it on old dried out wood as it rejuvenates the wood and gives a beautiful finish. I have used it both as a finish coat and as a base coat for wax…

Step Six: Apply Top coat
The oil is just applied with a paper towel in the direction of the grain. See how the shine is amazing compared with the un-oiled left side?

Here it is completely coated… and I wait again… patience is a virtue right? I wiped it off after 15 minutes.

Step Seven:
Apply coat of dark wax, applying with the grain, buff with 0000 steel wool and shine with a soft cloth.
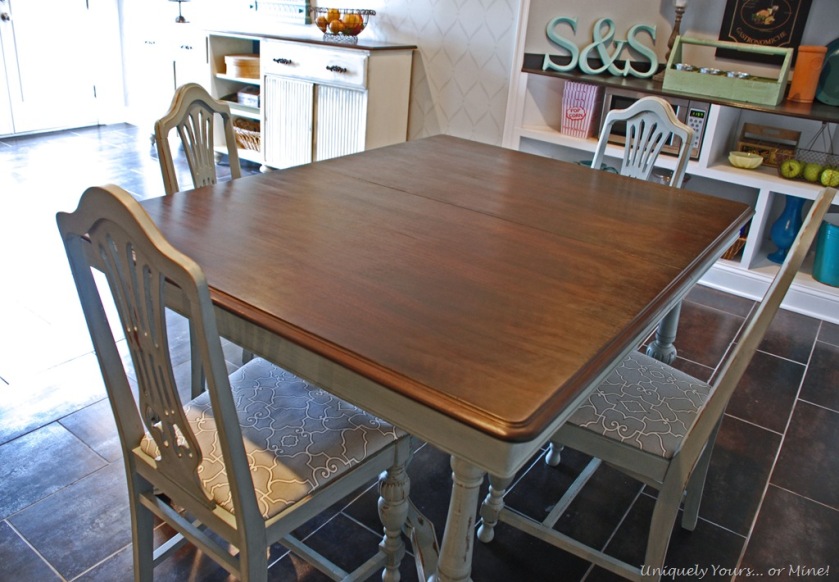
Here it is all finished (thank goodness!)

I distressed all of the paint and applied CeCe Caldwell’s clear wax to the painted parts. We then buffed the table with 0000 steel wool and a soft cloth.

This is what the chairs looked like originally…

I painted them the same Smoky Mountain Grey, distressed, waxed and buffed them all. I removed the old fabric from the cushions, added some new batting and recovered them is this pretty grey and white trellis patterned fabric.

Oh how I LOVE the look of all of these legs / columns… but I REALLY disliked painting them all!

I have this set staged in my basement kitchenette area because honestly I was just too lazy to move it all outside and back in again ![]()

So I am hoping that this is the last table and chair set I do for a little while, although I know I have another one to do for a client but she doesn’t need it done until November.. WHEW!!
Thanks for stopping by!
Until next time…

Linking up to these parties!
Between Naps on the Porch, The Dedicated House, Coastal Charm, A Stroll Thru Life, Elizabeth & Co., Savvy Southern Style, Domestically Speaking, From My Front Porch to Yours


Fabulous job! Very labor intensive, but worth the effort. Laughed when you said you were “too lazy” to move that huge project. Lazy is not a word I would use to describe you and your wonderful work with furniture.
LikeLike
Thanks Peggy! I never thought of it that way… I was just like, let’s just take the pictures here, I hope there is enough light 😉
LikeLike
Wow! This is utterly fab, such dedication to your project. Hope you keep this one yourself, so much heart & soul went into it…Well done! x
LikeLike
Oh it was very labor intensive, but worth it! This is not a keeper though.. Sad I know 🙂
LikeLike
Susan,
What a lot of work! It’s beautiful. I love that paint color… May just have to put that on my list!
LikeLike
Thanks Kathryn! It is a very pretty color, more blue than grey for sure!
LikeLike
Absolutely gorgeous. After doing all this work, how do you ever part with any of the projects you do? lol…
LikeLike
Thanks Joann! I couldn’t possibly keep all of the pieces I loved, I think I would be living like a hoarder 😉
LikeLike
this is gorgemegusssyeeee and you should be proud of all your hard work this is really a wonderful table set…are you keeping or selling curious of how you price yours..compared to when what I price mine…again devine and shows off your effort
LikeLike
Thanks so much Kathryn! This one is priced at $900, for the set, I think it’s a very good price so I hope it sells for that…
LikeLike
Absolutely beautiful and well worth the price tag of $900!!
LikeLike
Thanks so much Elaine! I hope it’s priced right, you just never know…
LikeLike
Wow! I am so impressed! What a beautiful transformation….Christine
LikeLike
Thanks Christine! It certainly was worth me waiting until I was mentally ready to tackle it!
LikeLike
Absolutely GORGEOUS!!!!
I’m redoing a clients dining room set next week – I know it’s a lot of work – but wow you knocked this one right out of the park!
Coming by from Coastal Charm
Big hugs,
Suzan
LikeLike
Thanks so much Suzan! It came out much better than I imagined.. Yay!
LikeLike
Amazing transformation! I love the gray color!
LikeLike
Thanks so much Kathy… This color is one of my favorites!
LikeLike
Coming over from Met Monday – love love your table and chairs
Stained wood tops on painted wood pieces are so pretty.
Rhonda
LikeLike
Thanks so much Rhonda! The top came out so much better than I thought it would!
LikeLike
I really love what you did to the table and chairs. Very nice. Susan @ throughmyporchwindow.blogspot.com
LikeLike
Thanks so much Susan!
LikeLike
Beautiful ❤
LikeLike
Thank you! It was a lot of work, but I love the results!
LikeLike
Your table and chairs turned out great. I love the blue shade.
LikeLike
Thanks so much Carol! I love them too!
LikeLike
That was quite a big job, but the result is beautiful!!
Mary Alice
LikeLike
Oh it was, but I just love the results! Thanks so much Mary-Alice!
LikeLike
You did an awesome job! Wow, beautiful, I think it looks totally new.
Come for a visit sometime….
Nancy
http://wildoakdesigns.blogspot.com
LikeLike
Thanks so much Nancy! I will come visit!
LikeLike
Looks great! Beautiful color!
LikeLike
Thanks Tammy!
LikeLike
I bet that was hard ! But defiantly worth it ! It’s beautiful ! I have been using the CeCee Caldwell paint too , I really like it . I haven’t found anywhere around here to get the Annie Sloan paint so I haven’t tried it .
LikeLike
Thanks Sharon! I like both paints pretty equally, they are differences though.
LikeLike
Wow, you did a fantastic job! Love this 😉
Jamie ~ somuchbetterwithage.com
PS: I’m having a giveaway on my blog right now 😉
And I’m your newest follower!
LikeLike
Thanks Jamie! I’m hopping over today!
LikeLike
Just beautiful Susan!
LikeLike
Thanks Sharon!
LikeLike
Hi Susan
I Have been painting and restoring furniture for a couple of years, but am so computor illiterate I never use one!!
I’m in the process of restoring an 80’s dining table and chairs for myself and thought I would look up table top finishes and restoration.
I discovered your blog found it really helpful and a real inspiration.
Thank you for your help and advice.
Who knows one day I may work out to do a blog myself.
LikeLike
Thanks you so much Hayley! Refinishing a table can be tedious but it is so worth the end results! I hope you follow along with my refinishing adventures, but I also wish you success with your project!
LikeLike
Hello! Can you do a tutorial or some tips on how to re upholster the chairs? I have a similar set and have no idea where to start with the upholstery. Love the work you do!!!!!! SO inspiring
LikeLike
Thanks so much Sonja! I have done a chair recovering tutorial, on cane chairs, but not one to just recover seats. The basic steps are to turn the chair over, unscrew the seat from the frame, remove the fabric (or not) and I stall new fabric stapling around the edges pulling the fabric taut but not tight as you go. Hope this helps!
LikeLike