
Happy New Year everyone! I didn’t work too much over the Christmas holiday, but I did get this easy project done… and while I realize that most people may not have two vintage Singer sewing machine bases on hand, we did… actually I only had one, but I found an exact match at an auction and snatched it up in order to do this project!
We (really me) wanted to make a table for the kids playroom… I had just bought a low vintage chest that I’m repurposing as a window seat (with storage!) and I wanted a table to sit in front of it for the kids to play with their houses etc.… They love building towns and frequently have their “towns” setup all over the floor and will play with them for days!
This is the story of the build… (it TOTALLY looks like SAH is doing all of the work in these pictures, but he’s not… someone has to take the pictures right?)
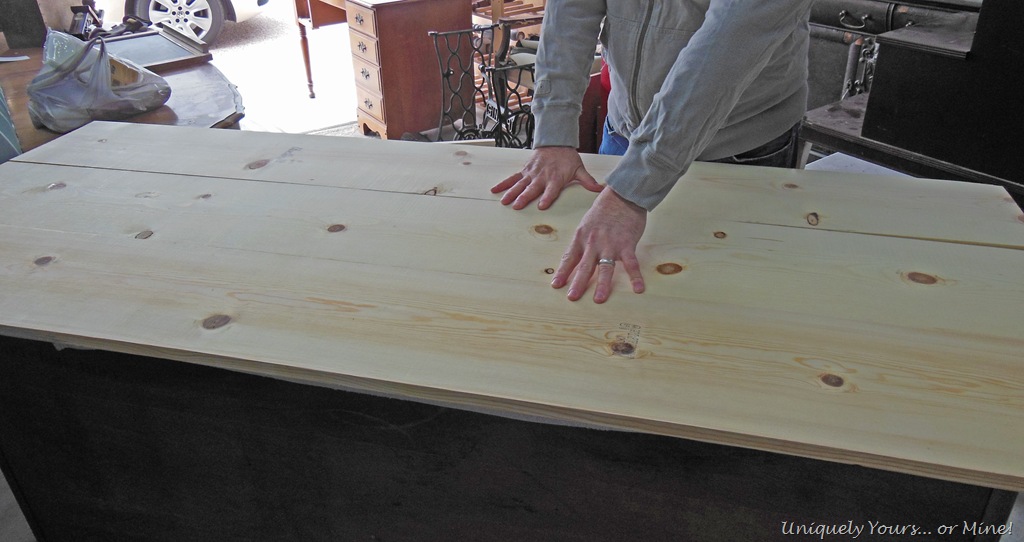
We used 3 6×10 pine planks and lined them up on a flat surface.
We attached the planks together with 3 pieces of 1×2’s using 2 wood screws in each plank. We drilled pilot holes prior to screwing… very important or else the wood can split!
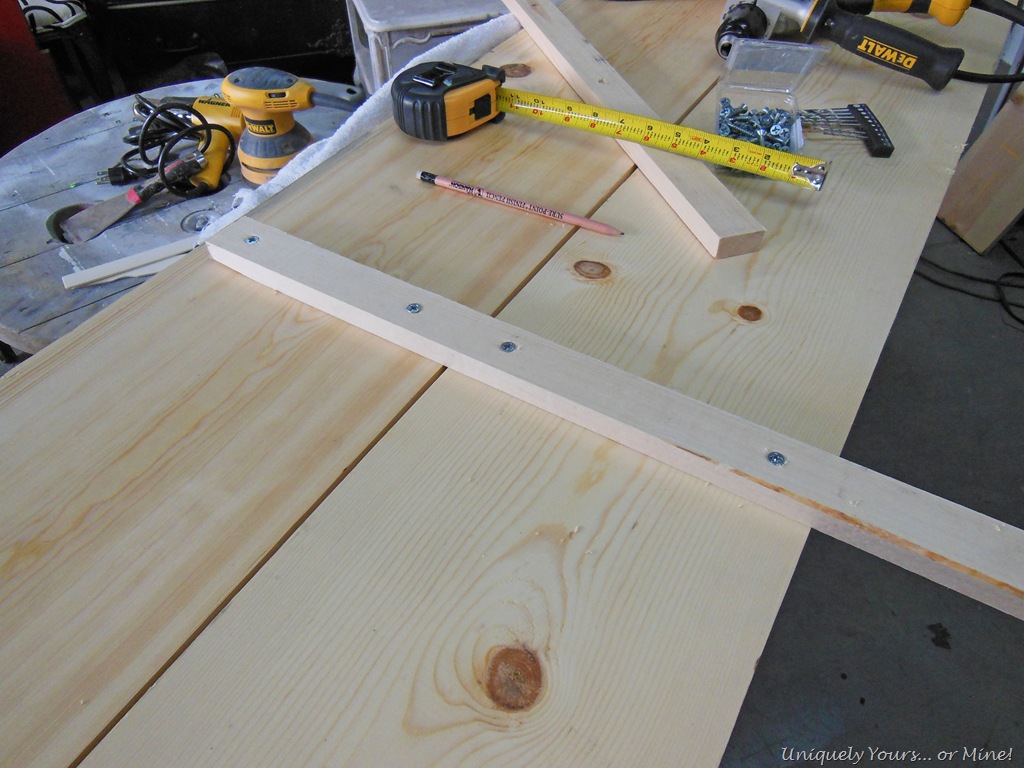
We left a gap between each plank, using a paint stir stick as a template, very hi tech!
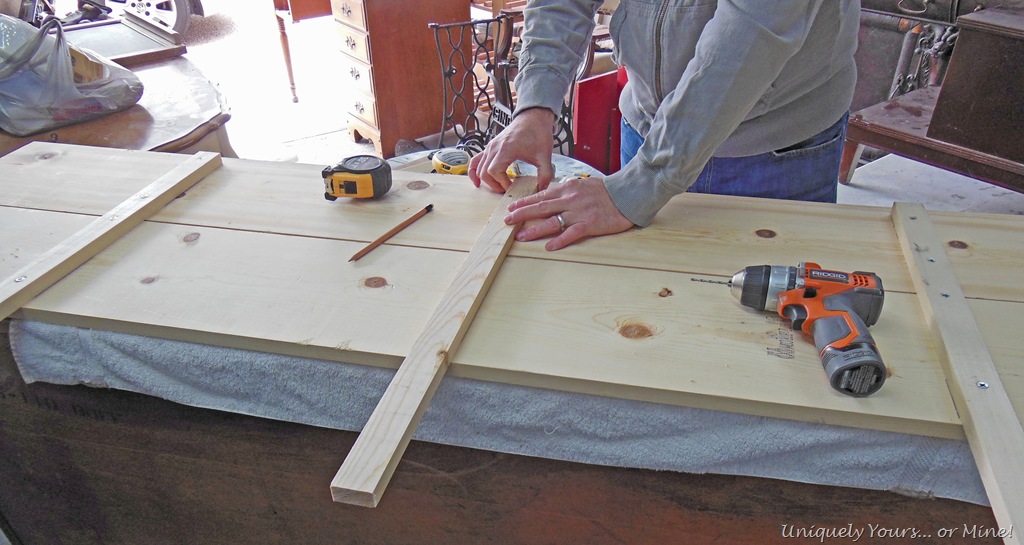
We sanded the top and sides of the planks with 150 grit sandpaper and took all of the pieces to the playroom to assemble. We attached the top to the bases with wood screws and set the table in place.

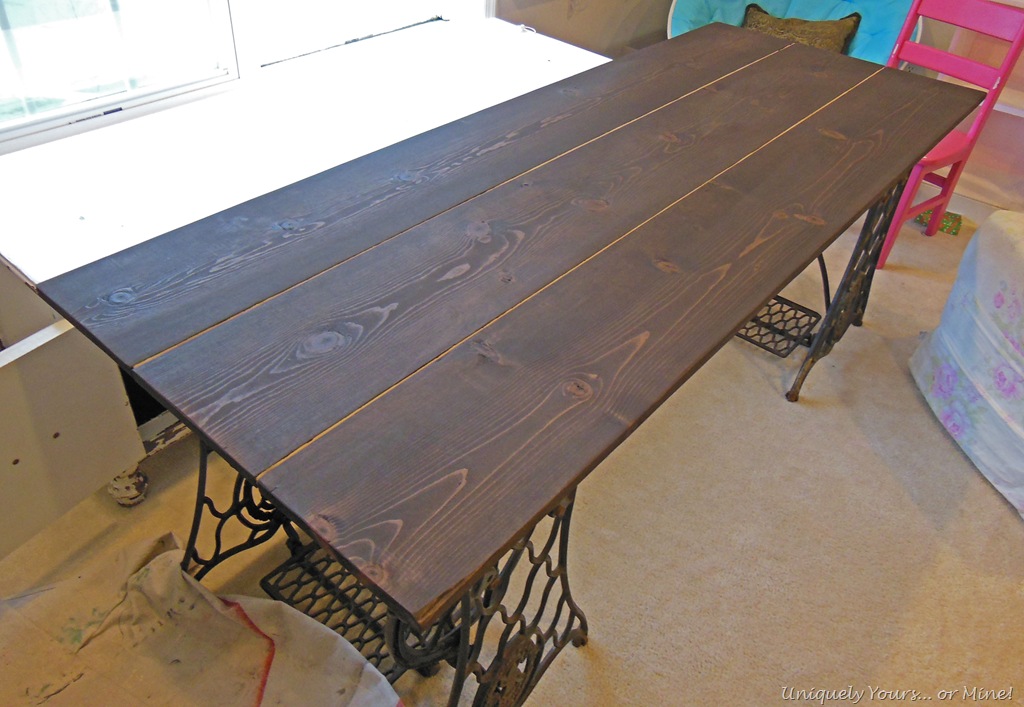
I stained the top of the table in place, I REALLY should have stained the planks first because I had to use a teeny tiny brush to get the stain in between the planks… I will remember this for next time! The stain is “Kona” and I only applied one coat as it is a very dark color.
I’m so glad I had all of this help ![]()

I knew I wanted to do something else with the top and this is what I came up with… The stencil shape just happens to mimic the shapes in the sewing table bases…

I used the same used the Moorish Trellis Stencil from Royal Design Studio I used on the stenciled bookcase transformation and some Benjamin Moore paint I had color matched to Provence ASCP… just a quick roll with the sponge roller, seriously it took maybe 10 minutes to do…

After the paint dried I applied a coat of Briwax Dark Wax to the surface which toned down the blue and gave it an aged appearance, it also added a beautiful richness to the finish…

After the dark wax had dried I applied a coat of Annie Sloan clear wax, making sure to rub it in really good. The next day I came back with some 0000 steel wool and buffed it… what a gorgeous sheen!

This is the perfect place for the kids to sit and play now! They can play board games or setup their LPS houses or whatever! My oldest daughter doesn’t understand why we went through the “trouble” of making this table look nice as she is certain the kids will “mess it up” but I have some faith… ![]()
Anyway here is the breakdown of the costs & time in case you are interested:
Sewing table bases: $24 for both (what!, I know…)
Wood: $44
Total = $68
Total time = 2 hrs.
I think that’s pretty awesome for a one of a kind table that is custom made for the space!

I’m super excited and I hope the kids will enjoy using the table! I’m also hoping that the extra storage added with the bench will help the playroom stay more organized but I’m not holding my breath! I still need to make a bench cushion, but I tend to procrastinate when it comes to sewing projects so it may be a while before I get to it…
What do you think… is the table just too nice for the playroom?
As always thanks for stopping by!
Until next time…

Linking to these parties!
Domestically Speaking, French Country Cottage, From My Front Porch to Yours, My Romantic Home, Between Naps on the Porch, Coastal Charm, Sumo’s Sweet Stuff, The Dedicated House, A Jennuine Life, Miss Mustard Seed


I love it and it’s on my to do list!
LikeLike
Thanks Virginia! It was an easy project so good luck to you with yours!
LikeLike
WOW! What an awesome table. Not too nice for the kiddo’s. Great idea.
LikeLike
Thanks Christal! I’m just hoping the kiddos don’t mess it up 🙂
LikeLike
What a great idea to use two bases, and the stencil is perfect!
LikeLike
Thanks Ann! I would have used the one base but I was having an issue finding a metal stretcher to connect the two sides…
LikeLike
Beautiful and practical! Love it. I so enjoy your posts. Happy New Year!
LikeLike
Thank you so much! I always appreciate comment love 🙂
LikeLike
Thist turned out beautifully. Happy New Year.
Cynthia
LikeLike
Thanks so much! Can’t wait to see your projects for 2013!
LikeLike
Your work is always so amazing! Love the stenciling!
LikeLike
You are sweet Cheryl! Thanks so much for your sweet comment!
LikeLike
totally unique and unsable
LikeLike
Thanks Kathryn! It was a simple project too!
LikeLike
Susan, love the table, I can see so many uses for this table, I’m afraid the children would have to share. Love it, great idea! Happy New Year to You!
Jeannie
of The French Hen’s Nest
LikeLike
Thanks so much… I think you are right about them having to share (with me that is)!
LikeLike
Never too early to teach your kids they deserve nice stuff that can be used every day! What a great job you have done, simple, beautiful and functional.
LikeLike
You are absolutely correct.. And I am going to think about it that way for sure!
LikeLike
Fabulous – it would also be a terrific cutting table for my sewing room. 🙂 You did an awesome job, and the kids are very lucky.
LikeLike
I know, it’s nice and long… Hmm… May have to rethink where it is now 😉
LikeLike
Stunning! Love it and love that the stencil mimics the base. I’m not sure I’d want to share it with my kids!!
LikeLike
Thanks Kathyrn! I read your to do list for 2013… I know you can do it!
LikeLike
Awesome table! I would have never thought to do that! Very crafty!
LikeLike
Thanks Suzanne! I wish I had the skills to have only used one… Maybe one day 🙂
LikeLike
Wow, I love this!! What a great use for those old sewing machine stands. I’ve never seen this done with one on each end. Love what you did to the top too:-)
LikeLike
Thanks Betsy! It was a great project for me to do with my hubby
LikeLike
gorgeous table- unfortunately my kids would have it destroyed if I placed it in their play room. Good luck in your’s.
LikeLike
Thanks Laura… My youngest is 10 so she should be able to play nice…
LikeLike
What a great idea, your table looks gorgeous.
LikeLike
Thanks Line! I loved making it and hopefully will have it around for a long time!
LikeLike
I love the bases. I have thought of doing that before, just haven’t had the need yet. BTW, did you know you can use the Briwax straight on the wood and it will stain it beautifully. I’ve never used it on a pine plank, but on two different pieces of furniture – one of which I used a dark stain then the Briwax for wax and the other I just sanded and used the Briwax straight on the wood – it worked identically. The depth of color was just as good on the Briwax only piece. I LOVE BRIWAX!!!
LikeLike
Ooh… Karen! I’m excited to try Briwax on raw wood what a great tip! Thanks so much!
LikeLike
I am soooo glad to have found your post! I have the two bases/legs but keep wondering how I’m going to make the table, and here it is!! Thanks so much! Yours turned out beautifully! ~Zuni
LikeLike
You’re welcome Zuni! I hope you have a fun time making your table!
LikeLike
That is awesome! I think I’m going to have to make something similar for my craft table!
LikeLike
Oh you totally should try doing that for your craftf table… seriously easy!
LikeLike
Well, Good Lord!! That is fantastic!! You never cease to amaze me. Thank you for sharing this at the Make it Pretty Monday party at The Dedicated House. Hope to see your prettiness again on Monday. Toodles, Kathryn @TheDedicatedHouse
LikeLike
What! You’re too kind 😉 Thanks so much Kathryn!
LikeLike
Amazing, I love it. What a creative idea. Thanks for joining TTT. Hugs, Marty
LikeLike
Thanks Marty.. and thnak you for always hosting such awesome parties!
LikeLike
What a great project! I have one of those treadle machines in my basement – now to find a match! I would love for you to come link up at my weekly linky party Thrifty to Nifty Thursdays at A Jennuine Life. I’m working with a couple of bigger bloggers to feature great projects, so I’m hoping to bring fabulous exposure for participants! http://ajennuinelife.blogspot.com/2013/01/thrifty-to-nifty-thursdays-2.html
LikeLike
WOW – this turned out simply gorgeous – love the stencilling – great great job!
LikeLike
Thanks Suzan… I love the stenciling too… Super easy a plus!
LikeLike
Susan, you will be one of the features at Make it Pretty Monday party at The Dedicated House. Hope to see you again at the bash…once I get the post live. Toodles, Kathryn @TheDedicatedHouse
LikeLike
Thanks Kathryn! I hope you feel better soon… but I think I’m in the same boat as you 😦
LikeLike
Love your site. I too used my bases for a kitchen table. However I made mine 4′ 1/2” long, put piano hinges on the sides with another 10” plank on each side. This did away with having to have a table to put leafs in, it fits 6 chairs. Painted lace runner down the center. hubby had no idea when I started, but loves it now.
LikeLike
Thanks Alonda! Your table sounds awesome…great idea!
LikeLike