I have some great news to share with you, we now have a contract on our home! While this is exciting news, it’s also bittersweet… plus I have a TON to do to get ready to move, and our youngest starts her new school on August 14th! We don’t ever start school around here until after Labor Day so we have some hustling to do to get her enrolled and ready! And believe it or not I am still finishing up two custom pieces that I will be sharing with you soon, but I wanted to share this post with you while the kitchen was clean… 🙂
I finished painting our kitchen cabinets almost four years ago (before blogging) but I DID take before photos! I know there are a lot of “How To” cabinet painting posts out there but I wanted to share the products that I used on my cabinets… I think the fact that they have held up so well after 4 years of abuse really says a lot about the products!
BEFORE
Pretty standard, brand new, mid grade cabinets that we chose knowing we were going to paint them!

By the time I took these photos I had already replaced all of the knobs on the cabinets with new ones.
 I also had already painted the island, I seriously did this before we even moved in (I know my neighbors thought I was crazy) but my older girls helped me out with this so it didn’t take too long. Needless to say the island cabinets were the same color as the rest of the kitchen.
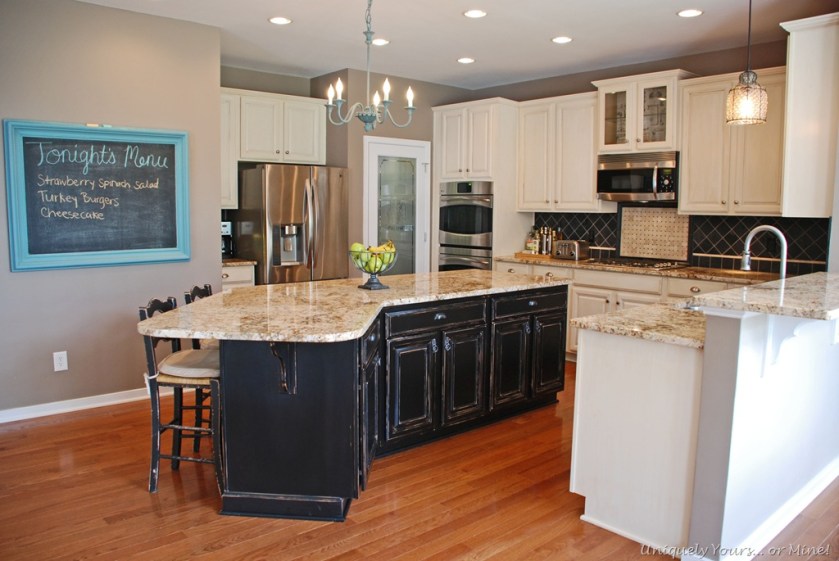
Here are the current after pictures!
We removed a can light over the island and sink in order to install the chandelier and the pendant.

We installed the travertine backsplash, removed the grills from the cabinet over the stove and added a glass shelf… all of my decorative stuff for the kitchen is packed away so this space looks a little bare now, sorry!

We replaced all of the hardware, I had to fill and redrill holes for the drawer pulls as the original knobs were single hole… We also replaced all of the electrical outlets and faceplates with black ones to help minimize their appearance on the travertine.

Replaced the wire shelving in the pantry and the pantry door.

I added molding to all of the doors and drawers in the center island. I was planning on doing the same to the rest of the cabinets but it took forever and I really was just not motivated enough… It was easy to do, just cut the wood and adhere with Loctite. Also, I let them sit for 24 hours with weights on them before I painted… it’s just tedious.

We also added a new baseboard around the bottom of the island. The original one only went along the fronts of the cabinets and didn’t wrap all of the way around… it just looked unfinished and strange.

The kitchen is a little depersonalized now due to the fact that the house is on the market, but I do love it! I forgot that we had opted for the taller cabinets when we built this house and I just noticed that the new house has the shorter ones… I may have to add some decorative cabinets to the tops of the new house cabinets!

I’m pretty sure more cabinet painting is in my near future as this is my “new” kitchen (and the house inspector). I think I will start with the island first… it looks a little more BLAH for some reason. Also installing a backsplash has to be on the list too…

I will be using the same paint products I used before because it just held up so well! I did a tiny bit of touch up on the cabinet that has the trash can in it, but other than that I just wiped them down with water and a sponge and they still look great!
So if you’re interested in tackling painting kitchen cabinets below is a list of the products I used… good luck and have fun!
Products I used:
-
Cabinet Coat paint, which is AWESOME, but can only be tinted in light colors. I bought mine at my Benjamin Moore store but I think I saw it at one of the big box stores recently.. The color I tinted it is the Benjamin Moore Navajo #947. I didn’t prime the cabinets but I did wipe them down with TSP first. I painted the cabinets with a foam roller & foam brush, it took 3 coats but each coat dries very fast.
-
The glaze on the cabinets is Benjamin Moore Kona #AF-165 mixed with a glaze medium 2:1 ratio, I already had this paint on hand as it is the color of my dining room. I just painted the glaze on and wiped it off leaving some in the crevices.
-
The chandelier is from Ballard Designs, I painted it with Annie Sloan Chalk Paint “Provence” and glazed it with Martha Stewart Glaze “Metallic Coffee”. SAH hung it where there was an existing can light.
-
We installed the tile backsplash ourselves one Labor Day weekend (fun times I tell you!)… It is black travertine “Noir” honed and had a wonderful smooth feel to it. We installed it at an angle which increased the installation time, but I prefer the look.
-
The accent piece in the travertine is Sandlewood “Corinth” honed, which I got for FREE! This tile comes in sheets and a lot of pieces in the sheets were broken so the manager just gave them to me… it NEVER hurts to ask someone for a price break but it is always unexpected when they give you something for free… YAY!
-
The backsplash behind the stove is Jinsan Bone “Noir Niles” and comes in 12×12 sheets. This stuff was super easy to install.
-
The granite we chose when we built the house is Juparana Persa and I love it! It is very difficult to see crumbs or a mess on it… fabulous for us and our little Schnoodle just loves to follow behind me when I’m wiping it down in hopes of getting a crumb or two!
-
The black center island is painted with Valspar Black satin, distressed, waxed and buffed. I didn’t prime this either, just wiped it down with TSP before painting. I applied 2 coats with a foam roller and foam brush.
-
All of my knobs are from My Knobs.com, I have 5 different knobs/pulls in the kitchen. The wall upper cabinets, lower cabinets & drawers are all in brushed nickel. The island drawers & doors have their own set in black iron… trust me, it works!
-
The pantry was originally that laminated wire stuff.. which I cannot stand using.. so we designed and ordered a new system from Easy Closets. I can spend HOURS on this website designing layouts for my closets… I have a sickness and I’m not too proud to admit it… I have a THING for a well organized closet! We bought the door from Lowes recently and it is actually pretty reasonably priced. I wish I had painted something cool inside of the pantry before we installed the shelves, but I just never got around to it…
-
So that’s it! I’m glad I got to show you this Before and After of my kitchen before we sold the house!
Leave me a comment and let me know what you think or if there is a cabinet paint that you would recommend!


Beautiful. They look amazing.
LikeLike
Thanks Christy, I’m dreading doing it again it’s just so disruptive!
LikeLike
I’m so happy that you are under contract, and that you have already found a new home. I’m sure I am not alone in wishing your family well in your new place, and can’t wait to read about how you are putting your signature touch on it. Now, go pack a box!
LikeLike
Thanks Cynthia! Luckily I don’t have to pack a thing! My husbands new company is paying for the move and the packers won’t insure anything I pack myself… It feels so indulgent as I’ve never used movers before… I’m very happy!
LikeLike
Congratulations on your sale! That must be a relief. Now you just have to get through the move! Love your cabinets and the travertine. You made your kitchen look so much better! Can’t wait to see your updates on your new place.
LikeLike
Thanks Deb! I’m looking forward to putting my own touch on the place! I have a brick fireplace that I’m totally going to paint now after seeing your post!
LikeLike
The buyers for your home, are lucky indeed!
LikeLike
Thanks Michelle… I hope they will love it as much as we have!
LikeLike
Susan, I love your handy work! I just found your site through Pinterest. I’ve been wanting to paint our kitchen cabinets but haven’t because I was afraid the paint wouldn’t hold up. Now that I have read your story I am ready to proceed. Thanks so much.
Trish Manns Parcher
LikeLike
Thanks so much Trish! You are not alone in being afraid, I have to paint my “new” homes cabinets and I’m so not looking forward to it! It’s not difficult just time consuming and repetitive but it’s got to be done! Good luck with your project!
LikeLike
Absolutely love this article on the ‘Top Kitchen Cabinets’! As someone who is currently renovating their kitchen, finding the right kitchen cabinet is crucial. The comprehensive insights provided here make the decision-making process so much easier. From trendy designs to practical storage solutions, it covers it all. I appreciate the attention to detail and the helpful tips for optimizing space. The article has certainly given me a clearer perspective on what to look for in a kitchen cabinet. Can’t wait to explore these top picks for my kitchen renovation project! #KitchenCabinet #HomeRenovation”
LikeLike