
Ok, so it wasn’t love at first sight.. she was VERY ugly!! I think she had 3 knobs, all mix-matched, water spots and peeling veneer.. but look at those curves (kind of hard to see in the cell phone picture above). She had mahogany veneer, the top drawers were concave, the middle drawer was convex and the bottom drawer had a flat front. She had original wood wheels and some intact carving onlay on the front legs. What I didn’t see until I got it home, thanks to the cr*p that was sitting on top of it, was a couple of VERY deep scars through the top veneer! I love to sand flat surfaces (seriously what is wrong with me?) so I started to try to remove as many of the scratches as possible. Most of them came out without effecting the veneer, but I had two holdouts and they were deep! I wanted to keep the top natural (stained) so I first tried to fill them with a stainable wood filler.. that didn’t work.. the filler did accept the stain but it clearly was a visible scar.. HUGE visible scar! On to option 2.. first let me say that I have never removed veneer before, but I looked it up on the web and it didn’t look too difficult. So out came my iron and a piece of parchment paper (to save the iron surface). I heated up the veneer and wow it looked like it was working!! But NO.. wait.. what is this..? The veneer layer, which is usually very thin, was SUPER thick. I had only removed a very thin top portion of the veneer, the majority of it was still there!! This stuff was so thick I was not heating it up enough to release the glue from the veneer!! I hit the web again.. based on my research I concluded I needed to be more aggressive. So I went to Home Depot and bought a small butane torch, it was one of those tiny ones that looks like the ones you can get at the cooking stores for toasting your creme brulee, so I felt pretty safe… I’m not going to kid you I was scared to use it.. I wasn’t one of those kids who liked playing with fire and honestly I’m a “little” accident prone. Long story short I got it started and used it to heat up, sometimes burn, the thick veneer to release the glue. I used a 3 inch scraping knife to pry up the veneer as I went along heating up about an inch or so at a time. Did you see the top of that buffet? I would work on it a few times a day, about a half of an hour at a time. It took DAYS to take that stuff off!! I also removed the veneer off of the front of the drawers. This was much thinner stuff and very dry. I basically sanded it off with 60 grit sandpaper! One side of the buffet had some veneer that had to be removed as well, I used a combination of sanding and heat to remove it. I also had some nasty velvet (?) from the center silverware drawer to remove.. so brilliant.. I used wallpaper remover and the stuff came up so easy! I cleaned out all of the drawers with Murphy’s Oil soap and they were ready to go!
I wish I had the forethought to have taken a picture of the “beast” at this point. The wood under the veneer was very pretty. I tried and tried to determine what it was but I couldn’t figure it out! The edges of the top and the tops of all of the drawers had a solid piece of mahogany banded to it.. it looked great! At this point I needed to decide what to do with the piece.. ok so you may be thinking shouldn’t you have decided that BEFORE you spent a million years removing veneer? Yes, is the answer to that question, but a lot of times I just get into a project not knowing the exact direction I will be going… not very efficient I know, I’m working on improving that!!

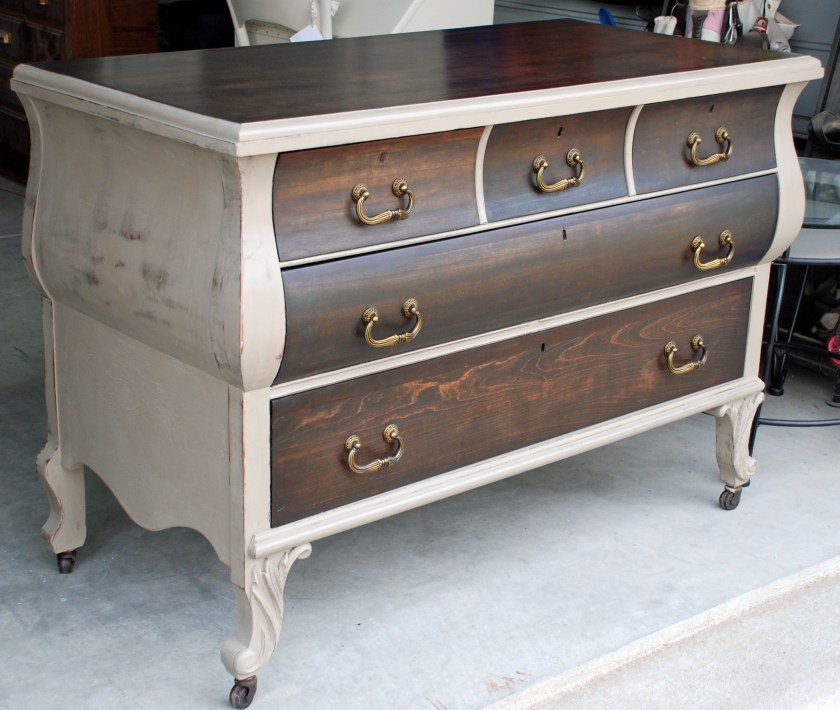
- After – Empire Buffet, Left Side


She’s so pretty now!! I wished I could keep it, but it was not to be a “mine” but a “yours” (now you see what the blog title means 🙂 I listed her for sale on Craig’s List and about a week later I had a women and her young (16ish) daughter come by to look at a cabinet I had for sale. Well they fell in love with the buffet and bought it for the daughter’s room to use as a dresser. They were redecorating the daughter’s room and felt that this would be a great fit for it.. she has a huge, tall antique bed that her grandmother had given her.. lucky girl! I hope that this will be a piece she will treasure for many, many years!
Ok, so this post seemed a little wordy, but there was a lot to do on this piece! What do you think about the finished product? Did I give you too much information in the post? Thanks for looking!
Linking this post up to: 

The Power of Paint Party
Crafty Scrappy Happy Me Thursday
Sisters of the Wild West
Restore Interiors
I was featured at: Apartment Therapy


Well, your picture had me at “ugly”! I love the lines of this piece and would have snagged it up myself! I just love what you did with it and what a lucky young lady to end up with it. I would have a hard time selling it, to be honest with you. You breathed new life into this beauty!
LikeLike
Thanks Beth! I appreciate the feedback! I do wish I could have found a place for it too.. But I had no where for it!!! Argh!
LikeLike
Lovely, you did a fantastic job, I also did a dresser, leaving the beautiful drawer fronts, I love the wood and paint together. I have tried wax, but never get the look I want, you did a lot of coats, do you buff? I will check out your blog, hope to have you visit me when you have time. Happy New Year
LikeLike
Marilyn,
I will certainly check out your blog! Thanks for the encouraging words! I have been using wax as a top coat for many years and love it. After it has hardened I buff it with 0000 steel wool and then a soft cloth. It gives it a beautiful shine and a wonderful feel.
LikeLike
Great Job!! I actually have my grandmother’s antique buffet and would LOVE to refurbish…but my mother would have a cow…or a duck!lol!
LikeLike
Thanks Piper.. I know what you mean! Thank goodness this one was someone elses greandmother’s 😉
LikeLike
Old is new again, very nice job !
LikeLike
Thanks Beth!
LikeLike
You did an awesome job…from ugly to gorgeous! I’m a new follower so I can see more of your great transformations. Stop by anytime, cause I love new blog friends, Lori
LikeLike
Yeah.. so happy you chose to follow my blog! Hopefully you will see some other pieces you like too.. Thanks for the feedback!!
LikeLike
Your buffet looks gorgeous. I would have never thought to use stain on the drawers, but it looks fabulous that way.
LikeLike
Thanks Pam! I like to stain the drawers when I’m using strong colors to help break up or tone down the color a bit.. Also when the drawers are gorgeous I have a hard time painting them … Thanks for taking the time to leave a comment!
LikeLike
It turned out lovely. Nice save!
LikeLike
This is beautiful! I love that style of furniture – good choice on the pulls and the color combo. Love it!
LikeLike
Thank you! I appreciate the feedback!
LikeLike
Love it! You did a great job! Diane
LikeLike
Bravo!! It looks wonderful!
LikeLike
What a gorgeous makeover. I love doing buffets also. I would love for you to share this at my Restyled Sundays party!
LikeLike
I’m in! Thanks for the invite!
LikeLike
Beautiful Job!!! Your hard work paid off in a beautiful piece! I’m sure the young lady will cherish it, but it had to be hard to let it go! You have a wonderful start on your blog. I have been blogging sine May 2010 & I am still learning new things all the time to improve my blog & posts. Come by & visit! I am a new follower, not only because I think you are interesting, but also because I know how hard it is to get started with followers! Best of luck & welcome!
Blessings,
Cindy
PS…I would let you know one thing if you haven’t heard it before. It is best to go to the visitor’s blog or email, who made the comment, to respond to them. Usually bloggers don’t revisit a post they have left comments on. Just an FYI!
LikeLike
Holy cow that piece came out soooo great! Welcome to blogging. A few blogger friends and I are collectively introducing a January challenge and it would be so fun if you want to participate. If you have a second, check it out at http://thespacebetweenblog.wordpress.com/2012/01/09/imagine-the-impossibilities-challenge/.
Karah @ thespacebetweenblog
LikeLike
That is an AMAZING makeover! So beautiful. We have a dresser that has veneer issues on the sides so I had planned to do a similar treatment, with painting everything but the top and drawer fronts. It is birdseye maple and we plan to just do poly on those and not stain them.
Visiting from the Shabby Nest!
Jenny
LikeLike
Can’t wait to see it! I always try to save the wood finish on some of the piece if I can and if the wood is awesome!
LikeLike
I like this one too… I think I’m back to square one… confusion. Which both of your makeovers look amazing!
LikeLike
Stopping by from Met Monday! Love how that piece turned out. The two tone is just gorgeous!
LikeLike
Thank you!! I love the two tone look so much.. Kind of obsessed with it in fact 😉
LikeLike
your hard work was well worth it. it’s a beautiful transformation. and i usually go in to projects not knowing what direction they will take either.
LikeLike
Thank goodness I’m not alone!! 😉
LikeLike
Hi! I love this piece! I think you did a perfect job of deciding where to use the color and where to leave the wood as is. It’s beautiful!
LikeLike
Absolutely beautiful! I love the combination of stained and painted pieces. I hope you sold this for like a gazillion dollars! That was a lot of work. I had a piece like that, and my post title was “The Beast”. I had a nice visit reading all your posts. You are very entertaining! I’m a new follower and I’ll be back!
LikeLike
This is so absolutely gorgeous, you did great work. I am featuring tomorrow at my party, thanks!
LikeLike
Gobsmackingly stunning! Love it 🙂
LikeLike
I see you used coco,my new fav ascp shade:) what color did you layer on it to get the washed look? thanks! beautiful piece btw!!
LikeLike
Hi Julie!
Thanks for asking! I love Coco too! However, I didn’t layer at all. The base was the original mahogany wood and I just painted coco on top of that. Does that help?
LikeLike
ah! you can see that now as i look back at some of the photos:) thanks for your reply! I have a telephone table that I’ve painted coco,wanting to add to it, couldn’t decide on an “old white”top layer,a washed down recipe,or leave it alone!! I have brown waxed another piece of coco furniture, but I’m feeling it would be too dark for this piece. on another note, have you used ascp on fabric? I would like to try a stencil of sorts on the canvas cloth I’m using to reupholster the bench portion. thanks again!
LikeLike
Hmm… old white and coco do look great together, instead of washing it do you have any areas you can highlight / accent with OW or another color? I have not used chalk paint on fabric, although I have gotten a fair amount of it on fabric by mistake! I can tell you I thought it would wash out.. it did not 😦 I use silkscreen paint on fabric… it is great! It looks like the fibers soak up the paint, rather than the paint sitting on top… just a thought! Good luck!
LikeLike
Wow! You did a fantastic job on this piece. And no, your detail on what you did is much appreciated. I like to take pictures at every step along the way — the screw-ups and all — just for my own documentation, as I don’t have a blog, but it remains instructive through other projects as well. This is what it’s all about — turning an old, tired, and unloved piece into something that anyone would be proud to own. I suspect that dresser is going to be around for another fifty years now. Nice work.
LikeLike
That is so beautiful! What a unique piece, I will be pinning this 🙂
LikeLike
Wow! Great job!!! visiting from Crafty, Scrappy, Happy.
LikeLike
Oh wow! I love empire furniture and have never seen a piece like that. I’m stopping by from Crafty, Scrappy, Happy.
Please visit me at http://badrabbitvintage.blogspot.com/ when you have time.
LikeLike
i adore this! love the finish, love the shape, love it all!
LikeLike
Thanks Cassie… she was a nasty girl though 😉
LikeLike
Hi! What a lovely, lovely re-do! I refinish and/or paint older furniture for a living, too, and let me say I am so impressed with this red-do.
Bravo for being brave enough to try removing veneer using a butane torch! I am just now wanting to learn about veneer removal, etc. And the wax coats on the wood are sublime.
As to having a plan before you do a piece, I would say not to worry if you don’t have a plan. Every piece of furniture is so different, I think it is actually best to deconstruct, sand, work with a piece and get to know it a little bit before deciding what the little beauty needs. So many times my “plan” has had to change, and usually for the better.
I am following you now – let’s have fun!
Geri in Kansas City
LikeLike
Geri,
Thanks for the kind words… but let me tell you the butane torch is teeny… It’s kind of sad that I was even concerned about using it! Thanks for becoming a follower!
LikeLike
Stunning!! Seriously…just STUNNING!!!
LikeLike
Thank you!
LikeLike