I just realized I have not shared any master bathroom renovation updates in a L-O-N-G time! I have shared some pictures on Instagram, but have totally been behind posting updates here! So thank goodness we finished the master bathroom portion of the renovation a couple of weeks before Thanksgiving and I am super thrilled with the final results! It was a ton of work but well worth it in my opinion…
I wanted to take some time to run through the steps we went through in the shower building process. It was a first for us and I will share with you where we did get help from contractors and where it was just me and my hubby plugging away at the job.
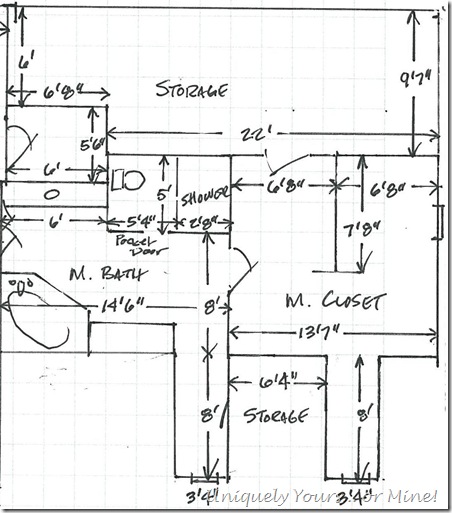
This is what we started with, hubby took this picture on the original walk through of the house, it’s a toilet and shower “room/closet” inside of the bathroom space. So the vanities and tub were all in the main room, but the toilet and shower were in a “closet” inside of the room (I hope that makes sense). It was dark, I hated it and I thought it was just strange… it had to go!
Here is the original setup of the bathroom closet area.
So as part of the overall bathroom remodel we removed the shower and the wall separating the closet/room from the rest of the bathroom. It was pretty easy to demo, as a matter of fact I took out the shower by myself. The walls were that faux marble, heavy, but easy to break up with a little force and of course safety gear.
We laid out a rough outline of the new shower dimensions (6ft. deep x 7ft. wide) with spray paint to validate size and position within the space.
We did all of the demo ourselves, but did have a contactor come in and rebuild the walls. I helped him a lot (so I could pick up some tips for the future) and I really enjoyed working with him and learning from him as well. We also hired a insulation contractor to blow in more insulation in the floor (which is over the garage in some areas) and also wrap reflective insulation around the backside of all of the walls to help with deflecting heat off of the roof.
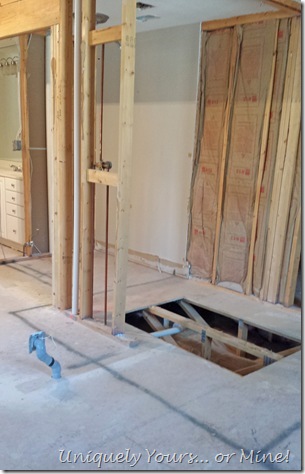
We also hired a plumbing contractor to add an additional shower head and move the drain. He had to tie the new head off of the incoming 3/4” copper pipe rather that running it straight off of the 1/2” pipe that was already there. This will allow 2 people to take a shower at the same time and get both get perfect water flow ![]() … just in case you were wondering why… We saved some money by locating the 3/4” junction ourselves and cutting the flooring for the plumber to gain access to the pipe.
… just in case you were wondering why… We saved some money by locating the 3/4” junction ourselves and cutting the flooring for the plumber to gain access to the pipe.
My Super Awesome Hubby and I had to shore up the floor openings with 2×4’s attached to existing support beams in order to add plywood over the holes to close everything up. We also installed all of the bat insulation in the new spaces ourselves.
We hired out the drywall installation and finishing, we’ve done drywall work before… it sucks and we done do a good enough job at it so we almost always leave the large drywall jobs to the professionals… just like rough-in plumbing…
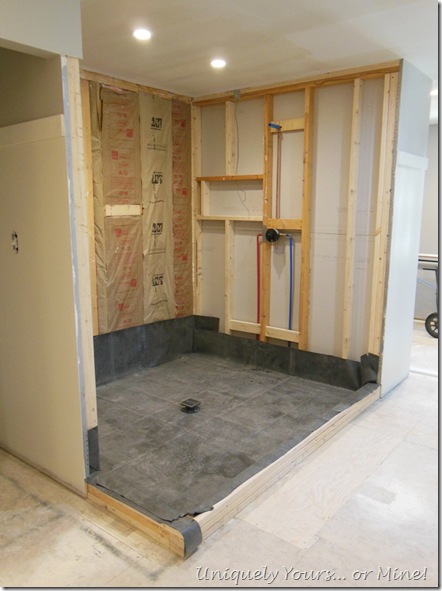
Our contractor then came back in and he and I installed the shower liner on the shower base. Making sure that the base was free of debris and all screws were countersunk in the plywood so that nothing could puncture the liner. By the way we used a pond liner here because I couldn’t find a shower liner big enough locally. It’s made of the exact same material, but it’s a lot cheaper and was plenty big!
We then mixed the Mississippi Mud base together by placing the dry material in the center of a tarp and adding the water to it in the center and shifting it back and forth by lifting the tarp up and down from the 4 corners. It’s a neat trick he learned and it made mixing the product super easy. He laid all of the mud down and using a level made sure it sloped properly towards the drain… I just watched him ![]()
After a few days he came back in and installed all of the concrete backer board. I then added the mesh tape to all of the seams and then filled the seams, holes and any low spots on the floor with thinset.
After everything was dry and smooth I painted 3 coats of RedGuard over all of the walls, floors etc.
We then dry-laid out our tile pattern on the floor to determine layout.
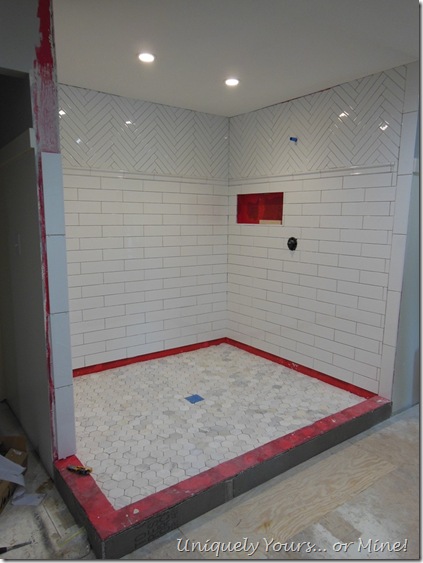
We then used a laser level and marked a level line about 3” off the floor to ensure a nice straight line, we temporarily installed a 1×2 on this line to ensure we maintained a level line. We then started applying thinset and laying the tile. We found it worked best to apply the thinset to the wall in about a 3ft square and then affix the tile to the wall. It also helped that we broke up the responsibilities, I laid the tile and my hubby marked and made all of the cuts… this was definitely a team effort!
I’m not going to lie to you… the herringbone tile part was a HUGE pain, I didn’t have to figure out the cuts, but it was a lot of little tile to lay and it took a long time!
We installed the Carrera Marble 3” hexagon floor tiles next, which compared to the herringbone tiling it was a walk in the park! Then after the tile was set, 72 hours I think, we went back and installed the last row of wall tile.
The shower sat ungrouted for a VERY long time while we worked on flooring and other projects, but we finally got it grouted with a white grout. I had originally wanted grey grout but changed my mind pretty much at the last minute…
We were then in a holding pattern for over a month waiting for the marble to arrive for the vanity tops and the shower curbing, but it was worth the wait to get exactly what we wanted!
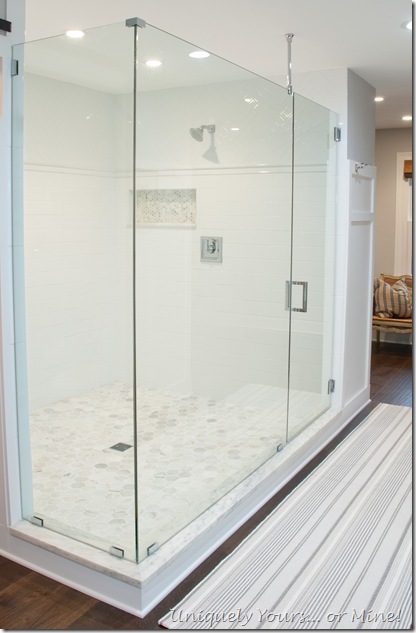
The hardware is all polished chrome and its as frameless as the glass guys could build it considering the size…
The setup we chose for the shower heads was very simple, 2 heads one on either side of the shower. We gave this a ton of thought and we decided that we wouldn’t use a bunch of different spray heads or a rain shower head often enough to justify the additional cost.
Each of the heads has it’s own max temperature setting, mine VERY hot, my hubby luke warm… The heads and trim package are a chrome American Standard set.
We actually used a marble threshold for the bottom of the niches, it worked perfectly and was significantly cheaper than other options.
I really love how the curb turned out. It coordinates with the Carrera marble but because it is so thick and solid I think it really shows well! The curbs are White Danby Vermont Marble in a honed finish.
Even though I’m more of a bather than a shower-er I really do love this setup! It’s obliviously plenty big for two of us to shower at the same time and with the ability to have our own temperature settings it makes it that much more enjoyable.
I do have one “complaint” with the shower, which at first when I saw it I thought I would cry, but I have sense gotten used to it… you see the glass surround distorts the color of the tile! I had no idea that the glass would have a slight green/blue hue to it so the tile doesn’t look white. I was not given the option of a pure colorless glass and when I spoke to the glass guy he indicated that this glass was the norm. I researched it a bit and found that colorless glass is available (not sure at what expense) so do consider that option if you are going to install glass in your shower… just a thought!
Thanks so much for stopping by!
Linking to these parties:
Redhead Can Decorate, Between Naps on the Porch, Blesse’r House, Designer Trapped











Hi Susan – your bathroom is coming along very nicely – I love space in a shower – although, like you, I prefer a bath, but it’s still nice to have a large one isn’t it 🙂 Mind you, even the rest of your bathroom looks ‘Huge’ – your a very lucky girl 🙂 Will look forward to the next ‘instalment’ – take care 🙂
LikeLike
Thanks Denise! I rarely shower, probably only when I’m filthy dirty, hot or in a hurry! But it seems like you and I are the exception to the norm as most people take showers… And yes, the master bath is a very generous size, but we did borrow some space from the closet in order to make the shower so big!
LikeLike
Wow! Looks fantastic! This part of your post caught my eye – “wrap reflective insulation around the backside of all of the walls to help with deflecting heat off of the roof.”. Could you provide any more specifics? We are always having roof problems (ice dams) in our contemporary house and are looking at various different solutions. Thanks so much!
LikeLike
I don’t know a lot about how it works, but it’s called reflective roll insulation and this is the second house we have had it installed in the attic / eaves area. It is stapled to the roof joists (over existing insulation) and is very easy to work with. I’m not sure if it will help with your situation but the product we used was purchased from Lowes.
LikeLike
Thank you! Will def. check it out!
LikeLike
Very timely as I just ripped out a bunch of ugly shower tile and want to put in a stand-up walk-in. Great tip on the pond liner! Totally going to look into that. Thanks!
LikeLike
Absolutely gorgeous. I wanted to do the Calcutta Gold Hexagon in our bathroom but it didn’t work into the budget. Love your Carrera shower floor and accents! Great job.
LikeLike
Thanks so much Kaylor! I considered marble tile for the walls, instead of ceramic, but the budget was my problem there. It was either small marble shower or large mostly ceramic shower, I guess you see which way we went!
LikeLike
Love love love your shower! Thanks for taking us through the whole process.
LikeLike
Thanks Brittany! I know very few people actually need to know all of the steps, but I like having them there for me to refer back to as well 🙂
LikeLike
Hi! Love your shower tile selections! Do you have a source list available for the tile?
LikeLike
Hey Carrie! I don’t have exact details but all of the tile we purchased from The Tile Shop. Hope that helps but if you need more details just let me know!
LikeLike
Did you use tile that was a shiny or matte finish? Looks shiny but I know photos can be deceiving.
LikeLike
It is glossy and very easy to clean
LikeLike
I love your shower! Can you tell me what thickness of marble you used for the curb? 2 cm or 3 cm. I cannot tell from the photo. Everything is lovely!
LikeLike
Thanks Tiffany! I’m not sure how thick it is, it’s the same thickness as our countertops though, which are pretty thick…
LikeLike
Would love to know the name and company of the 3” hexagon shower floor It’s absolutely gorgeous.
LikeLike
Thanks Cindy! I don’t know the name of the tile, but we purchased it from The Tile Shop, last I was there they still carry it too!
LikeLike