So I am TOTALLY ridiculous! It’s taken me forever to get this together, not because it took forever to do but because we were working on 4 projects in the kitchen at once and it’s been a little messy for a while. I finally got it all together to share with you, so glad you weren’t holding your breath waiting for it… jesh…
I shared with you a while ago (in this post seen here) my progress on updating the kitchen island (you may want to check it out to see more detailed steps of the process). Again, it wasn’t very difficult, I just had a lot of downtime in between coats of paint waiting for it to dry… I wanted a nice smooth non-distressed finish on this island which is why I chose to use Benjamin Moore Advance paint instead of a clay or clay and chalk based paint. I am super happy with the end result!
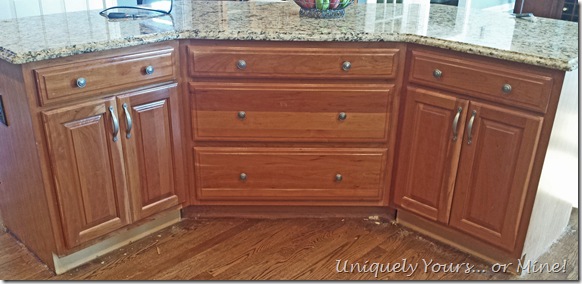
To refresh your memory this is what we started with, well sort of, I had already removed some moldings before I remembered to take a photo but you should get the general idea…
Here again, missing some pieces but you get the point right?
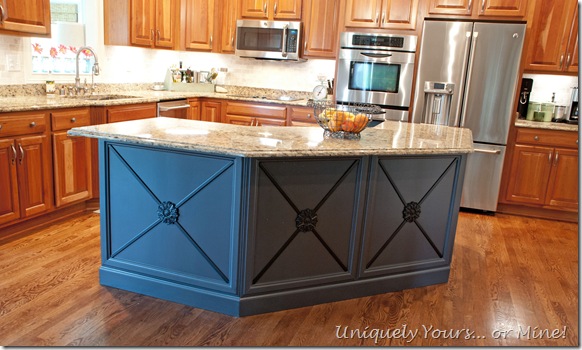
Here is where we are now! Which also includes new pendant lights, sink, faucet, backsplash, under cabinet lighting & wall paint.
We also changed out the electrical outlet from white to black so it would be less of a contrast.
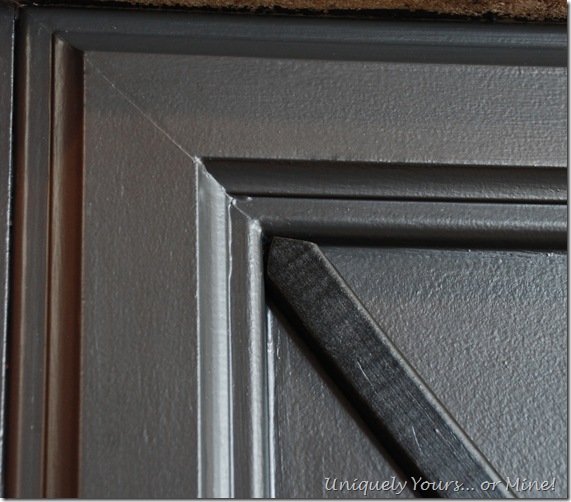
After painting the cabinets my SAH and I cut thin wood strips to fit inside the boxes. We cut a point at the tip of each one in order to fit into the corners, they are not perfect but I did the best I could…
One of the wood strips was cut to fit around the other so that there was no overlap where they meet in the middle. We labeled each one on the back (very important since they were all a little different) and then I spray painted them and the center wood appliques satin black.
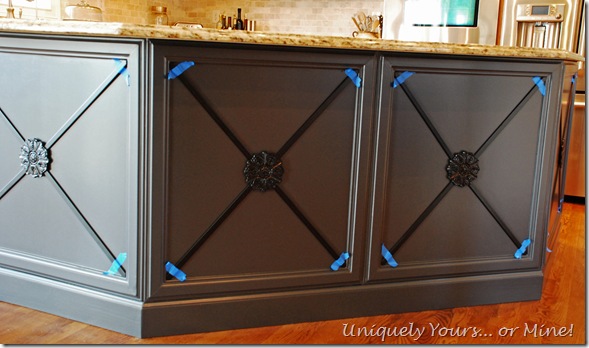
I attached the wood strips to the cabinets with Loctite and held them in place with blue tape for 24 hours to ensure that they adhered properly. I then nailed the medallions onto the center of the strips.
The picture below the closest representation of the cabinet color. I needed enough light in the kitchen to take the pictures but when I looked at them afterwards the cabinet color looks navy blue in the pictures … it’s not… it’s a super dark gray or soft black.
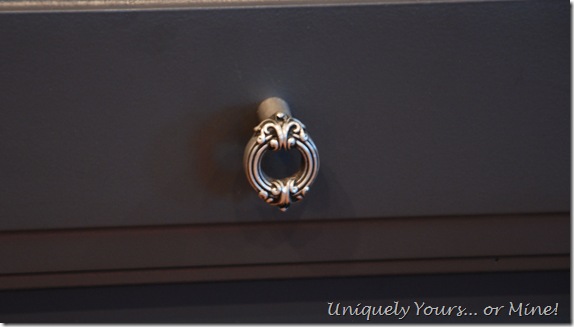
I bought new pulls for the large, heavy center drawers.
We used knobs we already had on hand for the other drawers and doors. I seriously have used and removed these knobs from our last two homes I love them so much… and no I didn’t take them after I sold the house, I replaced them before I even listed the house… what kind of person do you think I am? ![]()
So even though we finished the island I still have to tackle the rest of the cabinets. That project is going on the way back burner, but I think I want to spray the doors so I may need to get it done by the Fall.
I hope you dig my newly updated island as much as I do, because I’m telling you it looks WAY better than it did! I’m working on editing the rest of the kitchen photos to show you more of the projects we completed in there.
HEY! Don’t be a stranger and come back soon! I’d love to hear what you think about the update!
Linking up to these parties!
The Dedicated House, Between Naps on the Porch, Coastal Charm, A Stroll Thru Life, Elizabeth & Co., Savvy Southern Style, Domestically Speaking, From My Front Porch to Yours, Funky Junk Interiors, French Country Cottage, My Romantic Home, Redoux Interiors









WOW Susan! It looks great. You have such wonderful ideas.
LikeLike
Thanks so much Laurie!
LikeLike
Really beautiful! I kinda like that the other cabinets are stained, but it’s your house!
LikeLike
Thanks Cynthia! I know what you mean and I was going to leave them like that because I like the look too, but the cabinets are showing their age (they’re 12) and I’m also considering (if allowed) reconfiguring some of the areas… so I think painting may be my only option.
LikeLike
It looks fantastic, Susan! Well done!! It looks like flawless finish!
LikeLike
Thanks so much Jess!
LikeLike
WOW what a stunning transformation!!! I LOVE IT!
LikeLike
That’s so nice of you to say Martina, thank you so much!
LikeLike
Your island is absolutely beautiful Susan! I love the color and the design! … And don’t you just love the word “complete”!
LikeLike
Thanks Sharon, and yes I do love getting thing completed!
LikeLike
Great job Susan! You’re really making the place yours.
LikeLike
Thanks so much Deb! It’s a slow process but that’s ok…
LikeLike
WOW!!! The island is amazing and I LOVE the pendants! The knobs are awesome too, and I totally would have kept reusing them. 🙂
-andi
LikeLike
Thanks so much Andi! I totally love the pendants too, Shades of Light always has a great selection of lights!
LikeLike
What an amazing makeover, I love it and your island is fabulous. Thanks tons for linking to Inspire Me
LikeLike
Thanks so much Marty! I’m loving it and the fact that it’s done 😉
LikeLike
Looking good. Hope you are well. Miss yoiu.
LikeLike
Hey Toni! I miss you too! I’m hoping to catch up with you when I’m in town for Cassidy’s graduation!
LikeLike
I really like your island update.
Sheila from MyKentuckyLiving
LikeLike
Thanks so much Sheila!
LikeLike
I am facing the decision on what to do with our kitchen Island, we have Cherry cabinets but I was thinking I wanted to change the kitchen island out and paint it. By seeing yours being painted a different color gave me a pleasing visual! The finish on this island is beautiful!
LikeLike
Thanks so much Rhonda! I hope you find the perfect solution for your kitchen cabinets!
LikeLike
Wow that is a great transformation. Sharing this at Wow this week.
LikeLike
So awesome, thanks Kim!
LikeLike
This is beautiful! So glad to see someone else painting cabinets 🙂 Love the color, and what a great kitchen! xoxo, Andrea
LikeLike
Thanks so much Andrea! It does seem like unpainted cabinets are quickly becoming extinct!
LikeLike
Amazingly beautiful!
LikeLike
Thanks so much Pam!
LikeLike
This is just so spectacular Susan – really – what a gorgeous custom island – those x strips with the medallions – absolute perfection!
XOX
LikeLike
Thanks so much Suzan!
LikeLike
Gorgeous makeover!!
LikeLike
Thanks so much!
LikeLike
This looks so classy! My wife would definitely love this! Great touch! –Patrick Tan
LikeLike
May be a dumb question but where would one find the medallion and metal accents!? I love this!!!!
LikeLike
Hey Kitty, the medallions I found on line, they are wood onlay’s you can find them at the hardware store too. I’m not sure what metal accents you’re referring too though it’s all wood except for the handles. So glad you love it!
LikeLiked by 1 person
I love the color that you used to paint the island itself! If I may, what is this color?
LikeLike
Hi Susan, Just started following you and am blown away with your work! One question about your island makeover, the medallion in the middle of the “X” does it sit on top of the “X” or is it flat on the cabinet? If it’s flat, how did you get the wood (of the X) to meet up to the “X” (does that make sense).
Thanks again for sharing all your beautiful work.
LikeLike
Hey Debbie, thanks so much!! The medallion does sit on top of the “X” (which is very thin wood) so it looks pretty good. My original idea was to inset it by tracing the pattern of the medallion over the wood and then cutting it out with a dremmel tool, but I wasn’t 100% sure about the medallions so this allowed me to easily change my mind later… so far I have not though. Hope this helps!
LikeLike