I hope everyone survived the snowpocalypse last week. We did get a few more inches of snow here in Louisville, KY but we missed out on the big snowfall that hit much of the East Coast thank goodness. I don’t know about you but I am OVER the snow! I have started some Lavender, Lamb’s Ear and Salvia seedlings in hopes of being able to get outside and work in the yard in the next 6 weeks or so… I think I need some outdoor time badly!
We began working on our kitchen island last week and over this past weekend. So far we have painted the kitchen, added a backsplash and added some pendant lights over the island. My original plan was to paint the island a cream color and leave the other cabinets as is, but after looking at the wear on the other cabinets I decided to paint them all… just not all at once.
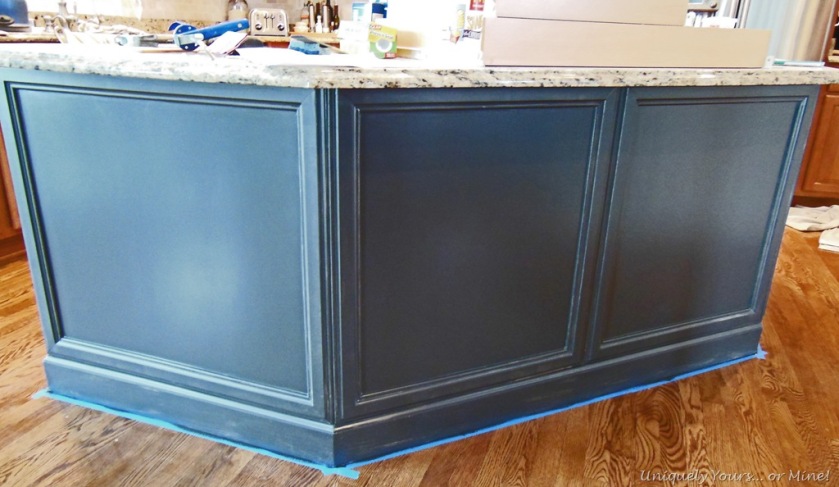
I’ll share with you where we are now as there are some final touches left to do in order for the island to be considered finished. I had already removed the shoe molding and toe kick at this point in the process.

It’s a nice size island and the shape works great in this kitchen, but as you can see the back boards have had a lot of wear and tear from people sitting there. It’s also very plain looking so I wanted to add some detail and interest to it.

I drew up this mock of what I wanted the island sides to look like. I used Word, because my drawing skills suck, so I could show my hubby what I was thinking about doing. I think the rendering came out pretty darn good if I do say so myself!

After removing the toe kick and shoe molding I removed all of the doors and drawer fronts, being sure to number them as I removed them. I filled in the bottom hole on each door because I am going to install new hardware.

We built a top for our pool table so we can use it as a table when we need to, I’m using it to paint the drawer fronts and doors which is much better than putting them on the floor. I first cleaned them all with Formula 409 and a scrub sponge and then sanded any areas necessary before priming them.

I didn’t have enough plastic triangles so these small plastic drink cups were the PERFECT solution! They kept the pieces stable and I happen to have a bunch of them on hand.

The fronts are still wet, but you get the idea… I used a soft bristle Purdy brush and a foam roller to get the smoothest finish I could. The paint is Benjamin Moore Advance in Black Iron, the paint is self leveling and has a nice hard finish once cured.

My hubby cut all of the trim for the island. I am the installer and caulker extraordinaire!

I was so happy I got to use my new “toy”! I got this fabulous deal at Home Depot right before Christmas on a air compressor and 2 nail gun set. I really did want need this… the smallest nails our other gun can handle is 2” and that was WAY to long for this project. We used Liquid Nails and 1” nails for all of the trim. The baseboard is 4.25” and matches the rest of the trim in the house.

The trim I chose is actually chair rail backing, which has great detail on it and I really like it used this way. Seriously my friend caulk and I have spent a lot of time together on this project!

This is after one coat of paint. I have to wait 16 hours between coats, which seems like forever, but I can get a good feel for how this is going to finish up!

I am still waiting for my appliques to come in and then I have to prime, paint and install the center detail work, but I am thrilled with how it looks so far. The addition of the trim really bulks up the cabinet and the paint helps this piece look brand new!
So now you know what I will be working on this week… I hope my back can stand it! I will share with you some good before and after shots once it’s all complete.
Hope you all have a great week ahead, thanks as always for stopping by!
Until next time…


Oh what a nice update Susan! I’m loving the color and the molding!
LikeLike
Thanks Sharon! I wanted something other than black, been there done that, this is not far off but still works with the existing granite.
LikeLike
i never cease to be TOTALLY and fully amazed by the work that you do — WOW! this is great, and i can’t wait to see what’s next…… ps. snow’s still hanging around in RVA, and this makes a 5-day weekend for the kids with snow days! ~stephanie (from the garage tutorial right before you moved!)
LikeLike
Thanks so much Stephanie! I am really stoked about how it is turning out! BTW the kids here are in school today due to all of the snow days they have had, my daughter was not thrilled 🙂
LikeLike
Susan that looks FABULOUS!! We painted our island black a few years ago and the hubby added bead board and trim…it made it look like a custom piece. Can’t wait to see the full reveal!
LikeLike
Thanks Martina! I painted and distressed the island in our last house black so I was trying to do a little something different this time, I think it’s going to work 🙂
LikeLike
It already looks so much better, I can’t wait to see it finished! Feel lucky you moved from NVA — we got dumped on with more snow expected tomorrow. Good news though is it’s supposed to be in the 60’s later in the week! I hear ya when you talk about wanting spring to get here!
LikeLike
Thanks so much Deb! Although we have had our fair share of snow here in Louisville too. I think we have a few warm days coming up soon as well, the climate is very similar to Virginia here…
LikeLike
It’s looking fantastic! Can’t wait to see it finished! 😉
-andi
LikeLike
Thanks so much Andi, you and me both 😉
LikeLike
Looking good so far. Can’t wait to see it finished. I am about to start a semi-kitchen updo! Island included!!!
LikeLike
Thanks Bridget! I’m not looking forward to painting the rest of the cabinets, I’m thinking of waiting for warmer weather so I can spray the doors! I hope your kitchen updo goes great for you!
LikeLike
Susan, you mentioned using liquid nails and that caught my attention. In March I plan to refinish a 1920s or 30s wardrobe. In the area used for hanging clothes, I plan to install 3 shelves. I’ve been thinking of how to do that without nails popping out of the side of the wardrobe. How does liquid nails work and what would you suggest I do to install the 3 shelves.
I do so enjoy reading your blogs and have learned so much from them! Do you ever just play? You seem to work all the time!
Rosemary
LikeLike
Thanks so much Rosemary! Don’t you worry about me, I play when there is play to be had but nothing is going on here with all of this snow now 😉 as far as your project can you install a wood support for the shelves, using liquid nails and shooting nails into the rail from the outside of the wardrobe? Liquid nails will hold the rail tight but I don’t think it is strong enough to hold anything on the shelf, it will need nails or screws. If the side of the wardrobe is thick you should be able to screw the rail on from the inside. Hope this helps!
LikeLike
It looks amazing Susan!!! Good old paint and molding – ( and the vision 🙂
Can’t wait to see it when the centers go in – beautiful job !!!
XOXO
LikeLike
Thanks so much Suzan! It’s certainly nothing compared to what you are going through at your new place!
LikeLike
You see the icon that came up with my name? That’s exactly how I look right now
LikeLike
LOL! I can actually see that!
LikeLike
Susan everything is really come along nicely. Love what you are doing with the island. I can’t wait to see this finished!! I wish this weather would take a turn. Our home is on a slight delay and hold, UGH!!
Cynthia
LikeLike
Looking great so far Susan, Love the design and the color!
Cindy@GlassSlipperRestorations.com
LikeLike
Thanks so much Cindy, I’m almost done 🙂
LikeLike
Wow. This is going to look amazing! I’ve been thinking about painting my island too.
I love that black and white together. So you like the BM Advance?? I have a quart on hand to do some furniture, but haven’t used it yet.
BTW, are you using the sandable (sp??!) and paintable caulk? Having miles of baseboard and molding finish under my belt, thought I would pass along what I use for filing in nailholes and miter joints. White wood filler in the squeez-y (I just make up words) tube. With the caulk you really can’t get a smooth finish when you sand. But this other stuff just blends in great. sand when it’s dry and you can’t even see the hole or gap after you apply paint.
Just my two cents!!
LikeLike
Thanks so much Beth! I prefer other paints than the Advance line, but I cannot get the color I needed in them. So far so good but it takes a mighty long time to cure… I am not using caulk for holes I am using spakling compound which gives a super smooth finish. I use caulk only for the areas on the sides of the boards. I agree with you on the point though. I really hate caulking, I hope your job goes quickly!
LikeLike
Susan,
this was very helpful for me, as I want to do something very similar. I can’t tell from the picture if you used the 4″ baseboard at the base and perimeter and down the middle of the island and placed the chair rail on top? Or did you just use the 4″ base at the base and the the chair rail is everywhere else?
Do you think liquid nails and caulk is adequate for application?
And did you use mdf or wood?
Thanks!!
Cathie
LikeLike
Cathie,
We installed new baseboard just on the base all the way around the island. We then created frames with the chair rail backing molding, where they meet at the corners they are installed back to back so it looks thicker on the corners. It really turned out so much better than I envisioned. If you use the same molding we did I think you’ll need a couple of nails to hold it in place, in addition to liquid nails. I think it may be a little heavy, but if you tape it in place while the LN dries it just may work. Hope this helps, let me know if you have any more questions and good luck!
LikeLike
Where did you get the medallions for the cabinets?
LikeLike
I’m sorry I just don’t remember but it was online. I searched wood onlay and found them that way.
LikeLike