This mirror framing project is part of the girl’s bathroom remodel that we just finished. The addition of the frames to the mirrors was not only super easy but it made a big difference in the look of the room. It’s kind of hard to see just how big this mirror is but let me tell you it’s H-U-G-E! it’s 5 feet wide by 5 feet tall, it goes all of the way from the top of the vanity to the ceiling. The light fixture is mounted through the mirror in case you are wondering…
For some reason all of the mirrors in the house are like this…
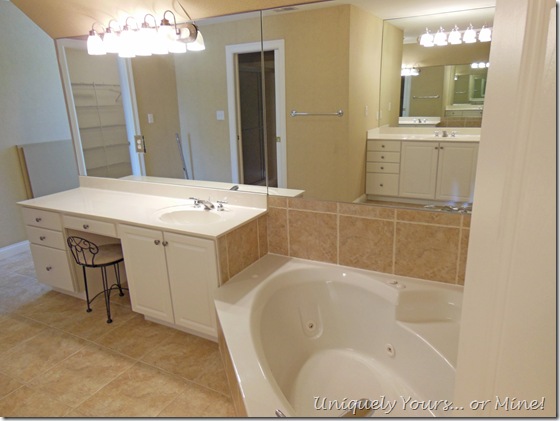
I’ve just never seen so many big mirrors… seriously check this out, the master bath mirrors!
The two mirrors you see straight on are all “my” side of the bathroom, the reflection you see on the right is my hubby’s “side”… his mirror is 6 feet wide by 5 feet tall!! I think mirrors must have been super cheap when they built this house!
So back to the girl’s mirrors…
I really do like the size of the mirrors in their space, but they were just so boring, so we decided to add a little trim to help jazz them up a little. First we cut regular primed wood molding (at a 45 degree angle) to fit.. Then I spray painted the backs of the frames black. Why black you ask? Well, the last time I framed a mirror I painted the backs white because I was painting the fronts of the frames white. However these frames will be painted a color so painting the back of the frame black makes it look like a shadow and will allow me to change the frame color in the future.
We installed the frames two different ways…
The first one we installed without painting the front of the frame first, it was purchased primed.
The second one we decided to paint the frame before installing it.
We used clear Loctite caulk to adhere the frames to the mirror. I applied the caulk near the outer edges so you don’t see caulk reflected in the mirror. We pressed the frame in place and held it in place with painters tape for about 24 hours… these frames aren’t going to be removed easily! I caulked the corners of the frames the next day and then painted the frames where necessary.
I preferred the installation of the already painted frame, I didn’t have to cut in around it and didn’t make a mess on the mirror, this is the way to go in my opinion.
We also changed out the ugly glass light shades to these very pretty glass shades I bought at Lowes.
They look like milk glass and have a pretty, classic shape. Changing the shades made a huge difference in the way the light fixture now looks.
AFTER
Much better right? The framing project was super easy, totally a DIY job! If you have something to cut the trim with you can do it!
Hope you like this project, it was by far the easiest thing I have done to beautify the house so far!
Thanks as always for stopping by…


Love how the mirrors look framed and love the new glass for the lights! I just changed out the glass in my powder room to seeded ones.
LikeLike
Thanks Martina! I love the seeded glass shades too, I bet they look great!
LikeLike
Love this easy inexpensive improvement! Good timing on your part! Justthe other day I mentioned to my Precious One that I’d like to put a large mirror (now in my stash) over the main BR sink.
He asked what we would do with all the ‘stuff’ in the old (too high on the wall) over the sink mirrored cabinet. I’m still trying to figure that out The BR is small and hard to put up another cabinet to hold those small often-used items. Where do you keep your small necessities?
Thanks for any advice on this one.
LikeLike
Thanks so much! I keep all of my goodies in the drawers in the vanity. I haven’t had a medicine cabinet in over 20 years! Have you thought about hinging the new big mirror so it will open and you can create a space behind it for all of your stuff?
LikeLike
Susan this came out great. I love the color and those shades really make a difference.
Cynthia
LikeLike
Thanks Cynthia! And I TOTALLY adore these shades! They really have a nice classic look to them and I was so glad I didn’t have to spend any more money to replace the entire fixture!
LikeLike