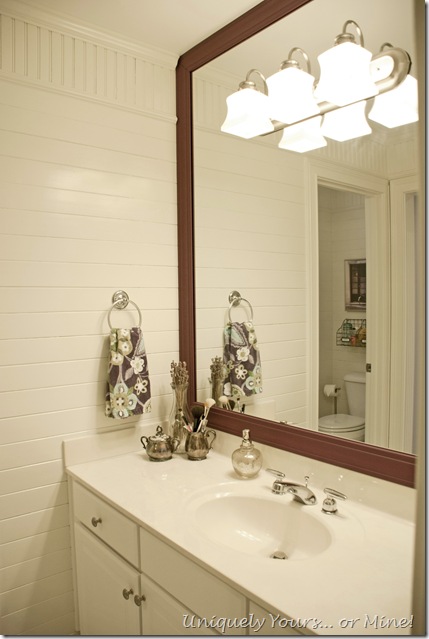
YAY!!! We are finished with the installation of wood planks on the bathroom walls! We started it just before Christmas and I am so happy it is finally done! Check out the first part of this post HERE for more detailed instructions on HOW we did it, but for now just enjoy the After photos!
Here is the BEFORE of one of the vanity areas
The tub & toilet area… and yes I know it’s a lot of doors! I wish they had used some pocket doors in this space…
The other vanity area… see the brass knobs & hinges on all of the doors too? Those I replaced a couple of months ago.
Here is the AFTER of Brie’s (the youngest) vanity. Her bedroom will be painted blue so the blue around her frame will coordinate with that when it gets painted… sometime next century maybe ![]()
The mirror frame is painted Anderson Blue and is a Benjamin Moore color, I will write a how to post on the mirror framing next.
Other than replacing all of the brass doorknobs and vanity light shades, I reused all of the existing fixtures. I’ll replace the vanity knobs after I paint it… maybe…
This is a close up of the detail on the wall planks. It starts with horizontal pine planks, then a small chair rail, then vertical tongue and groove bead board, then crown molding… so worth it I think! The paint color is Sherwin Williams Velvet White, it is the same color used on all of the trim throughout the house.
This is Sierra’s side, the purple is “Elderberry Wine” by Benjamin Moore and is the same color as an accent wall in her bedroom (I will share that makeover with you soon).
We also changed out the globes on the light fixture in this room as well.
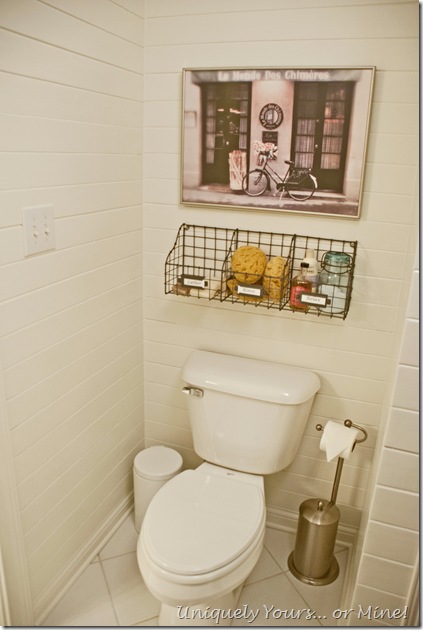
This is the tub & toilet area of the bathroom. The shower curtain I sewed for them a few years ago and since the colors still work it’s staying, plus I really love it.
I also replaced the original “boob” light for this more traditional looking light, it’s very big and I almost didn’t have enough clearance for the door to close… I completely adore it! I found it on line at Lamps Plus if you’re interested.
I also reinstalled their “spa” basket and added a framed print that we had in storage. I also reused the toilet paper holder we already had instead of reinstalling the roll holder on the wall. The girls prefer the stand holder because it holds extra rolls and is easy to change the rolls… I’m all about making it easier for them whenever I can!
The soaps are lavender and make the bathroom smell wonderful!
I think the Before and After shot really shows the HUGE improvement!
I hope you enjoyed this “little” bathroom makeover. While the installation part of the planks and trim were by no means hard, the amount of caulking, hole filling and painting was pretty time consuming. I think I’m going to take a little painting break!
I love the results of the bathroom makeover and I hope to never have to paint this area again!
Thanks as always for stopping by!
Until next time…
Linking to these posts:
Between Naps on the Porch, The Dedicated House, Coastal Charm, A Stroll Thru Life, Elizabeth and co., Savvy Southern Style, Domestically Speaking, From my Front Porch to Yours, Remodelaholic


Wow! So inspiring! This is really beautiful, Susan.
LikeLike
Thanks so much Aimee! It took forever but it was worth it!
LikeLike
It turned out beautifully! You deserve a break!
LikeLike
Thanks Deb! I moved right onto kitchen painting, but that was easy!
LikeLike
So beautiful! Love the planking on the walls.
LikeLike
Thanks so much Audra!
LikeLike
An awesome transformation. Love the transition from the horizontal boards to the bead board to the crown molding.
LikeLike
Thanks Donna! That’s my favorite part too!
LikeLike
What a fabulous makeover. It looks like a totally different room. I love it. Thanks for linking to Inspire Me. Hugs, Marty
LikeLike
Thanks so much Marty, we are enjoying them being updated for sure!
LikeLike
Susan I LOVE LOVE how this bathroom came out!!
LOVE those walls!
LikeLike
Thanks so much Martina, I’m pretty happy with them myself 😉
LikeLike
Looks fabulous!!!
LikeLike
Thanks so much Mary!
LikeLike
Susan! It’s amazing! I love the wall planks. I want to do that somewhere in my house. Thank you for sharing at Make it Pretty Monday! Hope to see your prettiness again next Monday! Toodles, Kathryn @TheDedicatedHouse
LikeLike
Thanks so much Kathryn! It was a project for sure!
LikeLike
What an amazing transformation!! That was some wallpaper! 🙂 I’m loving the planks! Thanks so much for the inspiration. Enjoy your day!
LikeLike
Beautiful! You always have such great ideas.
LikeLike
Thanks so much Laurie! My poor right hand is still suffering from all of the repetitive movements, but I do love the planked walls!
LikeLike
Wow wow wow, Susan! What a beautiful transformation! I love the mix of textures! Daring, and it really truly works!!!! Just love it all!!!
xxoo laurie
LikeLike
Thanks so much Laurie, that’s super sweet!
LikeLike
Susan, your transformation is awesome. What a change for the better! I’m a new blogger and will be looking forward to seeing what other things you can transform.
LikeLike
Thanks so much Marsha! I wish you well on your new blogging adventure!
LikeLike
Wow! What a difference! Looks awesome. 😉
-andi
LikeLike
Thanks again Andi!
LikeLike
Susan, you are one of the features today at the Make it Pretty Monday party at The Dedicated House. Here is the link to this week’s party! http://thededicatedhouse.blogspot.com/2014/01/make-it-pretty-monday-week-86.html Hope to see your prettiness again at the bash! Toodles, Kathryn @TheDedicatedHouse
LikeLike
Hi! I hopped over from your feature at Elizabeth & Co. I’m loving your bathroom redo, especially your green mirror. It all says instant cottage to me.
LikeLike
Thanks so much Laurel!
LikeLike
I love this!! Especially the blue frame on the mirror. Sooo cute! I’m sharing on my FB page later today and already pinned!!
LikeLike
Thanks so much Laura! It was a huge change for the bathroom for sure!
LikeLike
It really does look great! I love the plank walls.
LikeLike
Thank so much Kim!
LikeLike
Totally LOVE the planks and the beadboard together, truly inspired … and I am stealing this idea for my dinning room makeover … Thank you so much for the inspiration!
LikeLike
Thanks Jodi! We love the look, it’s traditional but also is just a tad different! Hope your projects turns out great!
LikeLike