The title should say it all.. but “why?” you ask would I buy a set of 3 chairs? Well, for one they were cool, and I am not about to pass up any cool chair no matter the number, they were inexpensive and lastly I knew it wouldn’t take much to get them into shape.
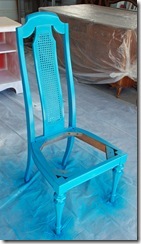
So other than the fact that they didn’t have seats they were in excellent shape. They, of course, needed a paint job but that’s no problem around here. After I decided I wanted to keep the one armless chair to use as a desk chair I had a general plan. I was going to spray paint them, which I hate doing ‘cause I stink at it, but the armchairs were going to get a coat of glossy black and the “keeper” chair was going to get a coat of blue that I already had on hand and LOVED!
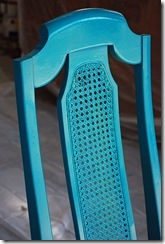
So I cleaned them up, lightly sanded a few areas and commenced to the spraying.. luckily it was about 60+ degrees outside when I decided to do this so it made the process that much easier. The armchairs got 3-4 light coats of black spray paint.. now let me tell you I started of with Valspar gloss black and by the second coat I was ready to pull my hair out!!! The spray was coming out erratically and the paint was sputtering onto the chairs!!! I cleaned out the nozzle, but it still was not working properly so I ditched the can I bought some RustOleum Gloss Black… which I have to say went on beautifully each and every coat… I will be sticking with RustOleum when possible, sorry Valspar lovers ![]() … Also, I didn’t get any during pictures of the black chairs (probably because of the hair pulling) , but the blue is a Rustoleum color named Lagoon.. I think it is a great vibrant blue and it went on very smoothly.
… Also, I didn’t get any during pictures of the black chairs (probably because of the hair pulling) , but the blue is a Rustoleum color named Lagoon.. I think it is a great vibrant blue and it went on very smoothly.
I then took a piece of scrap wood and made a seat template (I would normally use cardboard but I didn’t have any!) by tracing the sides if the chair onto the wood. I cut the wood with a jigsaw and then used that template to trace out and cut the seats. I used what wood I had on hand, which was a pine board less than 1/2” thick. I did a quick sand on the edges after I cut them then used the board as a template for my foam.
Using a 2” think foam I sprayed both the board and the foam with foam adhesive and VERY carefully put the two pieces together. I was then preparing to cover the foam with batting when I remembered my stapler was broken and the whole project ground to a stop… seriously… I should have planned better!
While contemplating what kind of stapler to get, how much to spend on it etc. I needed to also consider future projects, the fact that the last stapler was the third in as many years and was $40+ when I bought it, which I thought was not cheap for a stapler. So I went to a local foam & upholstery supply shop, asked for help and came home with what I can only describe as an AWESOME stapler. I t was not cheap at $165, but it will see me through many, many projects without frustration and you really have to factor that into your purchasing decisions. It is an electric stapler made by Romeo Maesrti in case you are in the market for one, oh yeah…and as a side note the staples were SUPER cheap, like $4.50 for 10,000 staples!
So after my new stapler purchase it is onto the rest of the project…
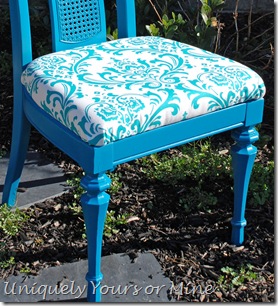
I just happened to have on hand some blue and white Damask print fabric perfect for my chair! I just cut it to size, pulled it tight and stapled my little heart away.. it is so nice to have the right tool for the job! I attached the seat to the frame with four screws and Viola! done…
I bought quatrefoil fabric for the black armchairs from Hobby Lobby.. I knew I wanted a graphic pattern on it.. but it is so hard to choose.. so many good choices, but I love how they came out as well!
I sold these beauties to someone before I could finish this post… I was actually on my way to take them outside to take pictures of them! Love it!
Thanks for looking! I love to read your comments so… please leave me one!
What do you think? Which do you like best.. the blue or the black? I happen to like them both.. but the blue one is my personal fav!
Domestically Speaking
Savvy Southern Style
Primitive and Proper
Restore Interiors
The Shabby Creek Cottage
House of Hepworths
Here’s to Handy Andy
Miss Mustard Seed
My Romantic Hone
French Country Cottage
Mum of All Trades
2805
Chic on a Shoestring
Funky Junk Interiors
Sisters of the Wild West


all gorgeous, but i am totally smitten by the blue ones!
LikeLike
Thanks Cassie! Me too, that’s why I kept that one 😉
LikeLike
Oh, the blue are fabulous! So cheerful and such a statement maker!
LikeLike
Thanks Crissy… too bad it’s “hidden” away in my study.. guess that just means I get to enjoy it all by myself 😉
LikeLike
Oh my gosh, absolutely gorgeous! Hobby Lobby has the best fabrics 🙂
LikeLike
They look awesome! This is one of my very next projects on my to do list! Stopping by from transformation thursday.
LikeLike
Thanks so much Katie! This was probably one of the quickest projects I have done.. lucky me!
LikeLike
Thanks for stopping by my blog today and giving me some feedback. I can see that you do love to paint and you’re so good at it. I will look in the paint that you told me about for the cabinets.
LikeLike
I believe I have the 4th one, seriously! LOL! I found one similar at the Goodwill last year, (without the arms), and have been trying to decide what to do with it! Love how you remade your chairs! Gorgeous and funky…perfect combo!
LikeLike
Thanks Rhonda… I love these chairs! I use mine at a desk I use for my sewing machine. Such a fast and easy transformation!
LikeLike
Beautiful! I would love for you to share these at our link party! http://herestohandyandy.blogspot.com/2012/02/pinteresting-link-party-week-25.html
LikeLike
Love the chairs in the blue…it’s always fun to throw a spash of color to a room. Great job!!
LikeLike
They’re all gorgeous! Great redo! I love the black – that fabric is a favorite, I used it for a lampshade redo!
LikeLike
Beautiful! My fav is the blue….the details just pop with that color.The black is lovely but I Love the blue! Thank you for stopping by and checking out my little chest of drawers. I am completely flattered on your comment after seeing all your awesome work. Def. a new follower!
Thanks Ashley @ Thereisnoplacelikehomemade
LikeLike
love them both! great work & great choices!
LikeLike
The blue one drew me in because I have a pair of blue chairs that are very much like them, except they have zebra fabric seats. I love the fabrics you chose for both colors, but I really love the black arm chairs! Nice job!
LikeLike
Thank you for sharing your lovely project at Potpourri Friday!
LikeLike